Create a WHS Risk Assessment in UQSafe
Who does this process apply to?
To all UQ workers (including staff, higher degree by research (HDR) students, contractors, volunteers) and others (coursework students, visitors) across all UQ operations and sites.
In UQSafe system a risk assessment can be created by all system users and the following roles participating in the risk assessment completion process:
Risk owner – person undertaking work, tasks or activities that require a risk assessment.
Risk author (risk logger) – person entering a risk assessment into the system on behalf of the risk owner.
Risk assessment team – If multiple persons are undertaking the work and are involved in the development of the risk assessment, they can be listed as part of the risk assessment team.
Risk approver – the person responsible for approving the risk assessment.
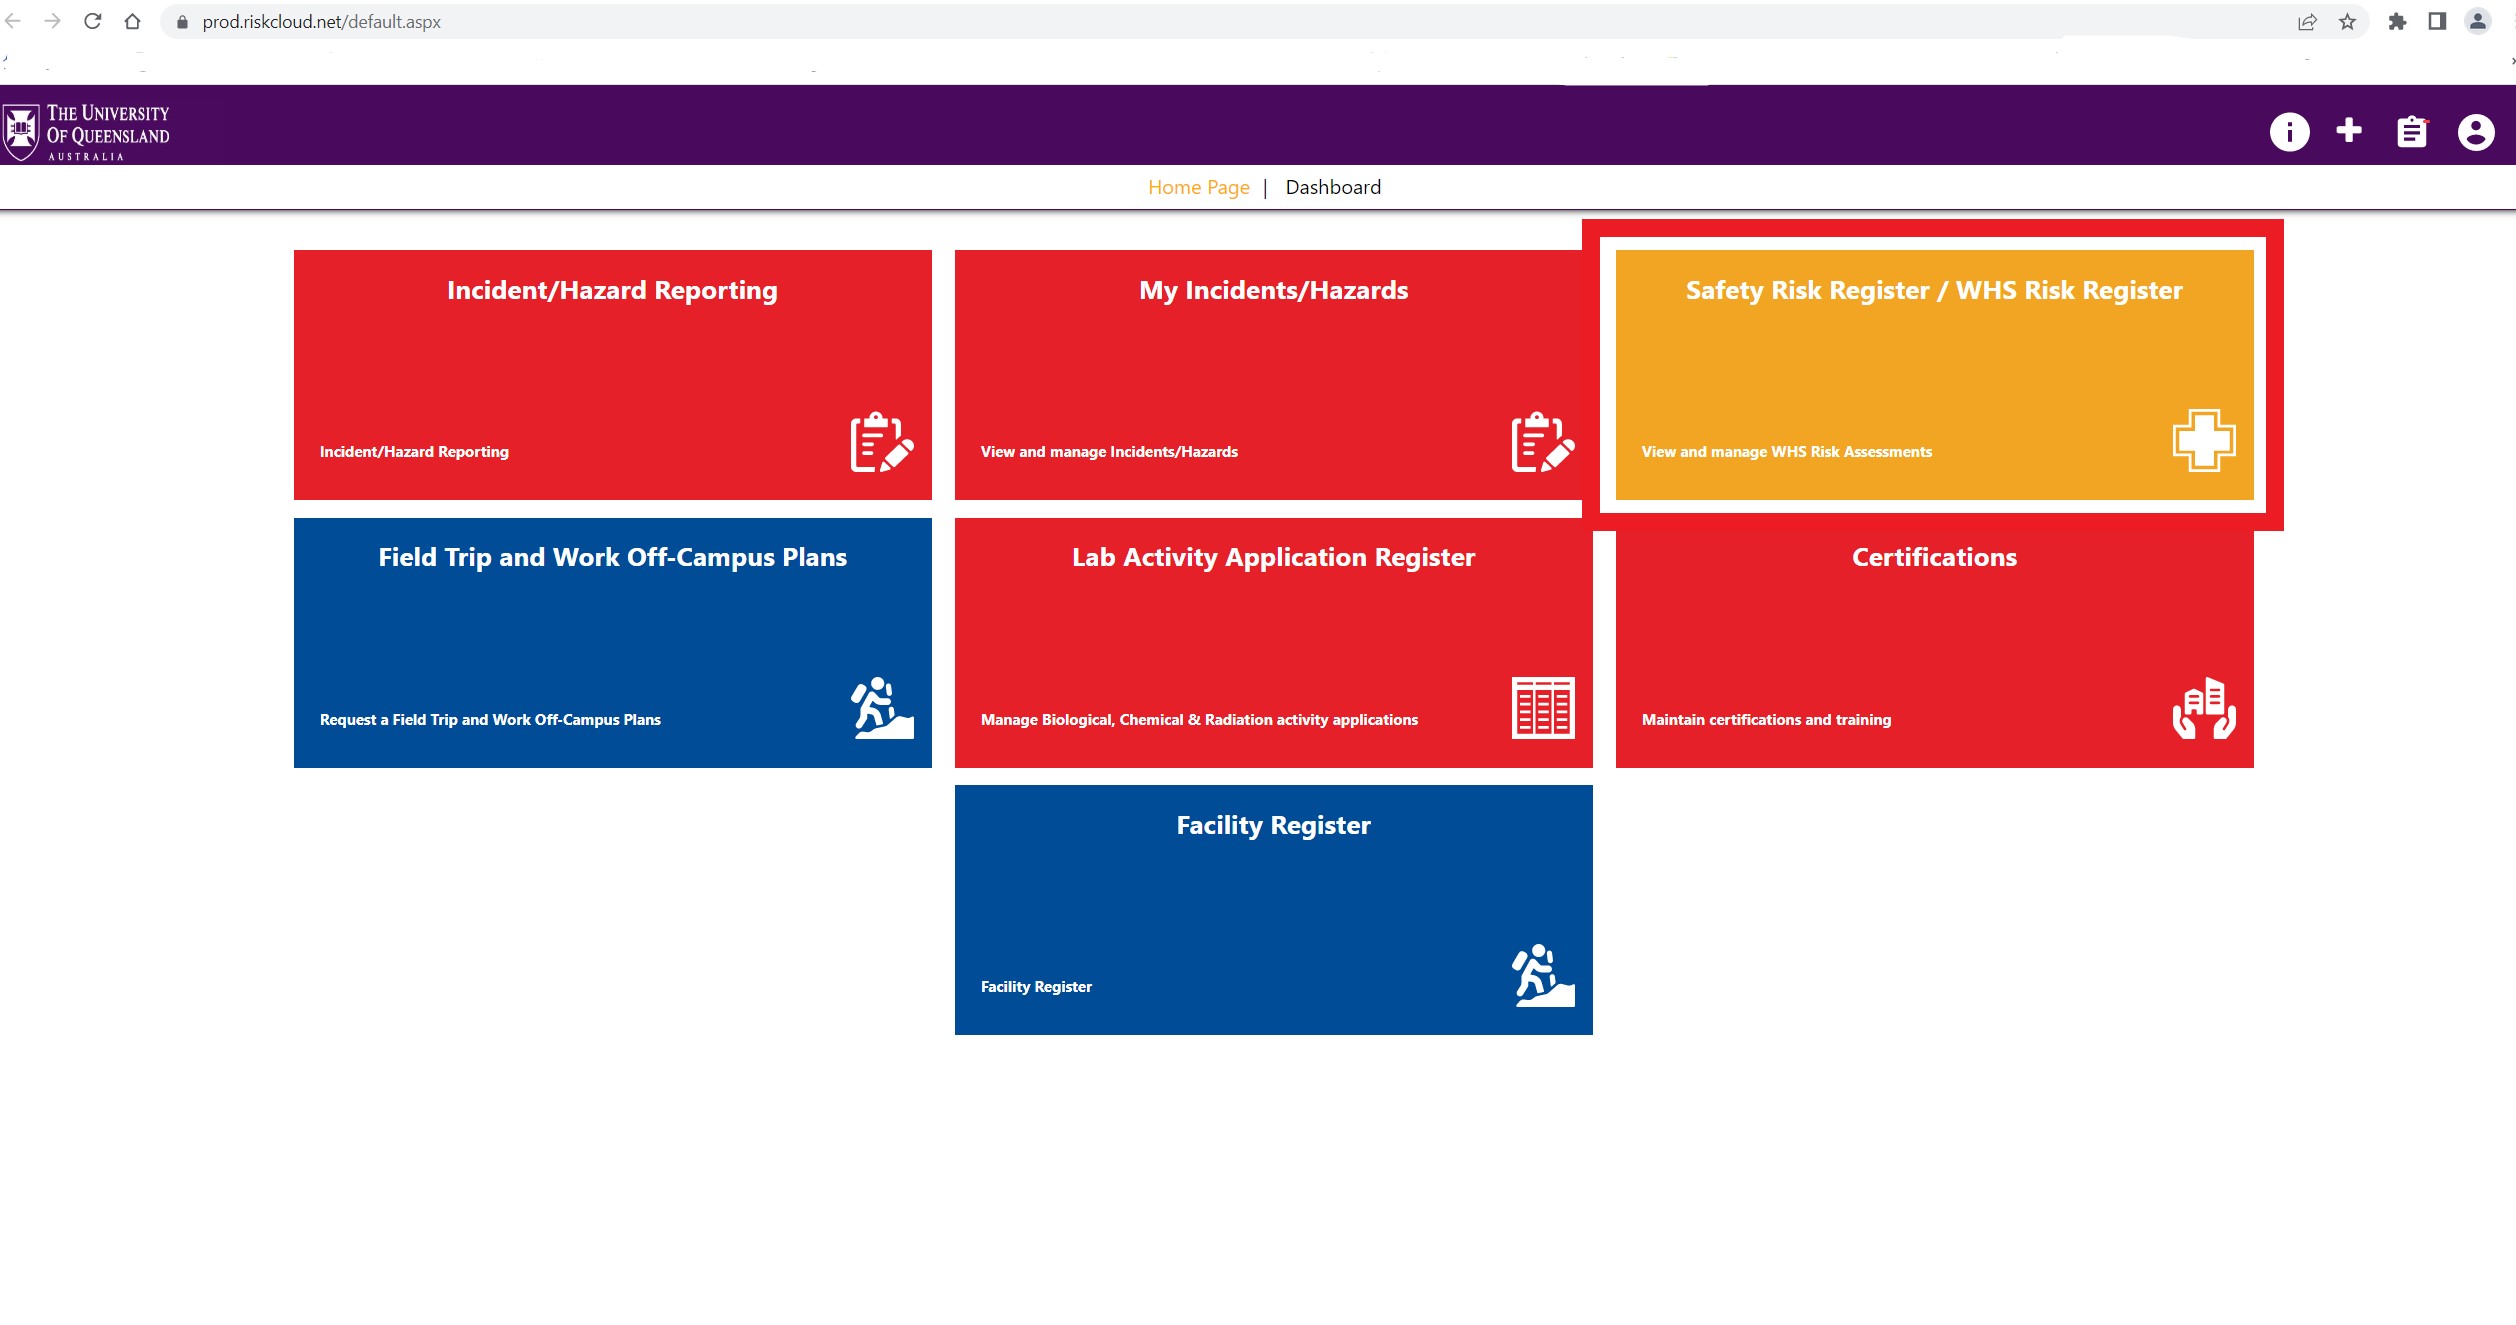
Step 1: Accessing WHS Risk Register
To create a risk assessment:
- log in to UQSafe system,
- go to the WHS Risk Register.
This is where you can access and read risk assessments completed by others.
Step 2: Creating a new risk assessment record
Click on the ‘New’ button which is located in the top menu and fill in all mandatory fields in the form. The mandatory fields are marked with asterisk symbol.

You will need to fill in two pages:
- Risk assessment fields (first page),
- Assessing the risk (second page).
![]() At any stage you are able to save your risk assessment as a draft by clicking the ‘Save’ button. This record is not sent for approval.
At any stage you are able to save your risk assessment as a draft by clicking the ‘Save’ button. This record is not sent for approval.

Step 3: Risk assessment fields
You need to fill in all mandatory fields on this page in order to progress to the second page 'Assessing the risk'.
Risk Assessment Name. Keep it clear and concise.
Location Category. Identify the location category relevant to the task by selecting from the dropdown list.
Describe task/use. This description is considered “establishing the context” of the riskassessment. The description should provide enough detail and context so that anyone who reads or approves the risk assessment understands why and how the assessment decision were made.
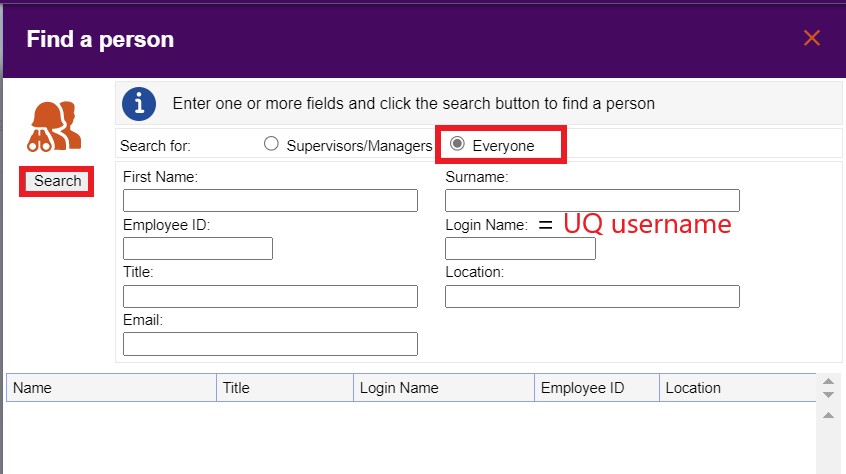
Risk Approver. This field populate automatically. If a supervisor’s name doesn’t automatially appear or is incorrect, please select the appropriate person via ‘Find a person’ function by clicking on ‘magnified glass’ icon. The risk approver should be a person directing the work and supervising the activity / task.
- Search using a first and last name fields or via UQ username typed into the field ‘login name’.
- Choose search for ‘everyone’.
- Search popup is closed and the person’s name appears in the risk approver field.
Date of Risk Assessment. This field populate automatically.
Risk Owner. This field populate automatically. Update this field if you create a risk assessment on someone’s else behalf. Follow instruction for ‘Find a person’ function in the Risk Approver point.
Assessment Team (non-mandatory field). Enter the team members who participated in the development of the risk assessment and persons who are undertaking the work associated with the risk assessment.
Effect. Do not change to ‘Organisation Wide’ effect.
Location. Select the relevant location from the dropdown list. Be specific to building if possible.
Business Unit. This field populate automatically based on the risk owner’s org unit in HR systems.
Documents referenced. Enter the titles of any documents that were used as part of this assessment e.g. Incident, Alerts, Manuals, Compliance Codes, Standard Operating Procedure, Safety Data Sheets, Permits etc. These documents can also be attached in the ‘attachment’ field.
Restricted Risk Assessment. You can restrict visibility of your risk assessment due to e.g. confidential data or privacy legislation. Visibility of restricted risk assessments is limited to the Risk Assessment Owner, Risk Approver (e.g the Risk Owner's Supervisor) and Safety Teams (local and UQ-wide Safety Teams). The risk assessment can also be made visible to Assigned peer reviewers and invited users.
Attachment. Upload files or documents associated with the risk assessment and/or those listed in 'Documents referenced' text box. Note: files' size upload limit is 7.56 megabytes.
![]() Once you have completed this page, click on 'Next' button to continue creating your risk assessment.
Once you have completed this page, click on 'Next' button to continue creating your risk assessment.

Step 4: Assessing the risk – second page
This screen is the main part of the risk assessment. You will see three main sections: Identify, Assess, Control as shown on the screenshot in 'Step 2: Creating a new risk assessment record' of this instruction.
Description the layout of 'Asessing the risk' page:
- Identify section covers Step 1.
- Assess section covers Step 2 and Step 3
- Control section covers Step 4, Step 5 and Step 6.
You must complete Steps 1-6 in order to finalise the risk assessment.
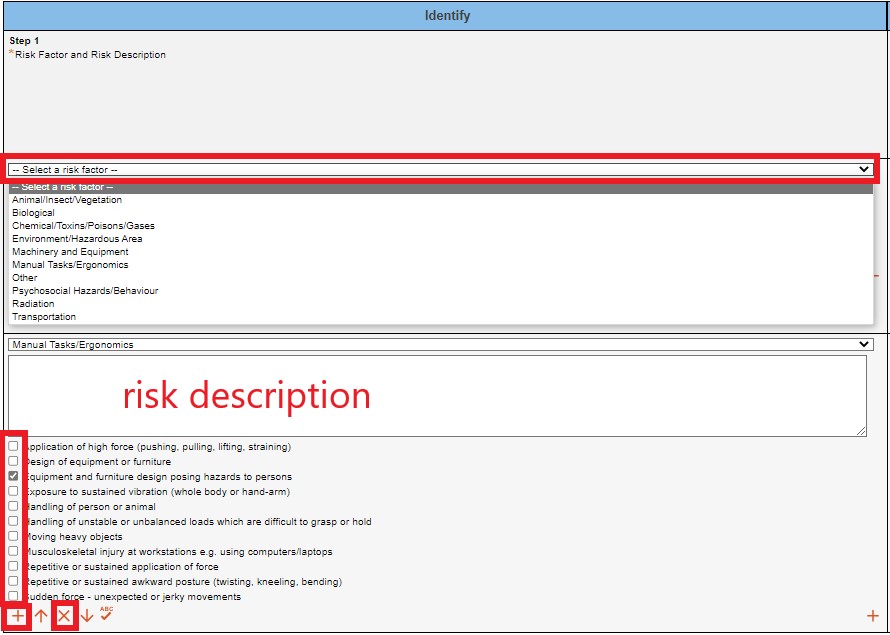
NOTE: In UQSafe a 'risk factor' is an equvalent of a 'hazard'.
Identify hazard
- Step 1. Select risk factor (hazard) from the dropdown list. There are 10 options for hazard to choose from as shown in the screenshot below.
- Once the hazard is selected, the associated risk factors display as ‘tick’ boxes. Select only the appropriate descriptors (one or more) from the list .
- Enter a risk factor description in a free text box. This description should explain the relationship between the hazard, the risks and the descriptor/-s you selected. The description should include potential exposure, possible consequences and determine most likely consequence.
You are able to:
-
 add another risk factor by clicking ‘+’ add icon located underneath the associated risk factors section or
 -
 remove risk factors by clicking ‘x’ remove icon located underneath the associated risk factors section.
Assess the risk
- Step 2. Using the hierarchy of control, describe your risk treatment of the hazard/-s (risk factor/-s) you identified in Step 1.
- Describe the existing control/-s in a free text box.
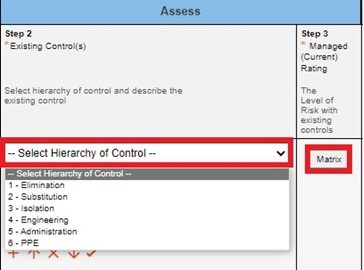
- Step 3. With the existing controls in place, determine the current risk rating. Select the level of risk with the existing control by choosing appropriate ‘likelihood’ and ‘consequence’ in 'Matrix' table.
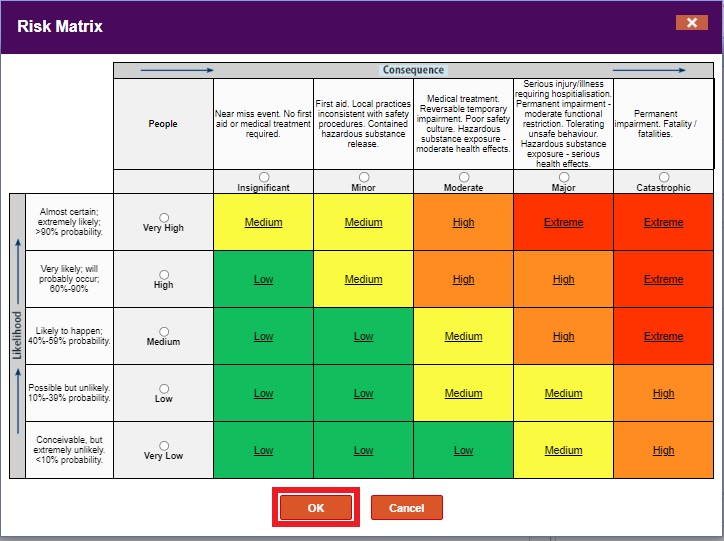
- Click 'OK' button.
Control the risk
- Step 4. Select hierarchy of control for proposed new control/-s. Proposed control/-s are required to reduce the current risk level.
- Describe the proposed control/-s in a free text box.
- Step 5. Indicate a person responsible to implement the proposed control/-s and a due date for implementation. The system automatically pre-fills this field with a Risk logger's name. You are able to amend the 'person responsible' field by using 'Find a person' function.
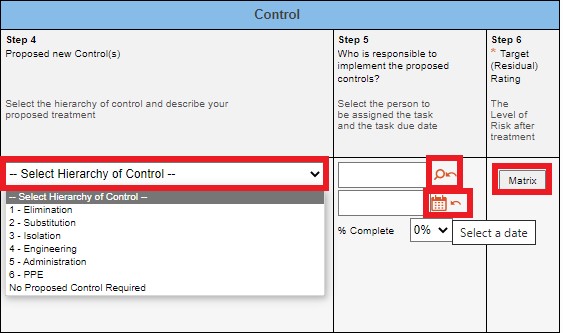
- Step 6. Determine the level of risk with the proposed control by choosing appropriate ‘likelihood’ and ‘consequence’ in Matrix table.
- Click 'OK' button.
This would be an acceptable (residual) risk rating, called in UQSafe 'Target Rating'.
![]() If you have multiple proposed controls, you can add new ones by clicking on the ‘+’ add button located underneath the hierarchy of control.
If you have multiple proposed controls, you can add new ones by clicking on the ‘+’ add button located underneath the hierarchy of control.
Step 5: Inviting others to peer review
It is highly recommended that each risk assessment undergoes the peer review process. Only draft risk assessments can be peer reviewed. If you want to initiate the peer review process, do not submit your risk assessment for approval yet.
 Hit ‘Save’ button.
 Invite peer reviewer/-s by hitting ‘Reviewer’ button.
For more information follow Risk Assessment Peer Review instruction.
Step 6: Submitting risk assessment for approval
![]() Once you have completed the risk assessment, click ‘Submit’ button.
Once you have completed the risk assessment, click ‘Submit’ button.
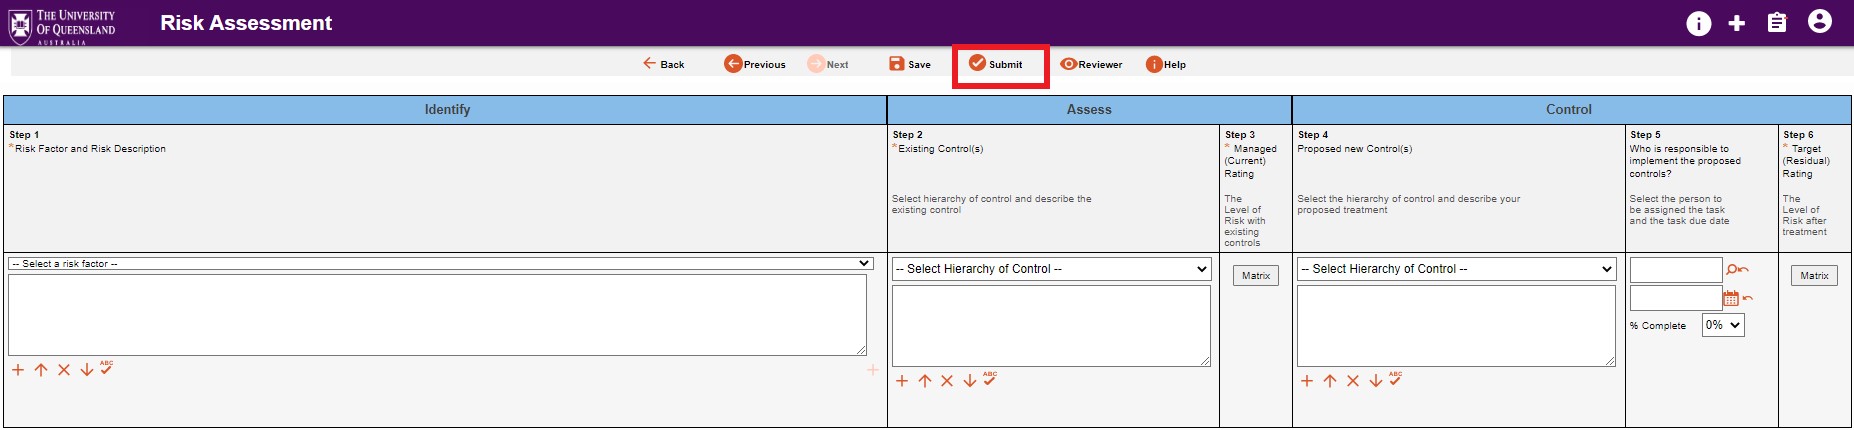
An automated notification will be sent to the risk approver requesting to initiate the risk approval process in UQSafe.
Note: Incomplete peer reviews cannnot be finalised once the risk assessment has been submitted for approval.
Questions?
Contact the Health, Safety and Wellness Division if you have any questions about this process.
![]() (07) 3365 2365
(07) 3365 2365