Build an Inspection Checklist Template
UQSafe is the sytem used to manage HSW inspections and checklists.
Checklists can be used to conduct workplace inspections, track activites in a process, monitor compliance and create tasks for actions to be done. You can create as many checklists as you need.
Who does this process apply to?
Checklist Designers: This user guide is for those staff who will be building inspection checklist templates within UQSafe, to support workplace inspection programs for their organisation unit.
Step 1: Organise your checklist questions into topics
Before you start
- Organise your checklist questions into topics (i.e. in an excel spreadsheet).
- Arrange your topics and questions in order to ensure good flow.
- Phrase your questions as 'statements' - UQ uses the following response types:
- Conformance - meets requirements.
- Partial Conformance - partially meets requirements.
- Non Conformance - minimum requirements are not met.
- Not Verified - no recent records or other form of verification available.
- Not Applicable - not relevant to the organisational area/activities.
Consultation
- Consult with your local stakeholders to review the list of questions and topics BEFORE you commence building your checklist in UQSafe.
Step 2: Apply for UAT test environment access
Checklist designer access
To request access and be assigned the 'Checklist Designer' security role in the UQSafe R3 UAT test environment, email the UQSafe System Administration team via uqsafe@uq.edu.au.
Information required:
- Organisational Unit?
- Approximate number of checklists to be developed?
- Titles of the checklist/s to be developed?
- Inspectors - Who will be completing the checklist/s?
- Analytics - Who requires access to the Register of completed checklists?
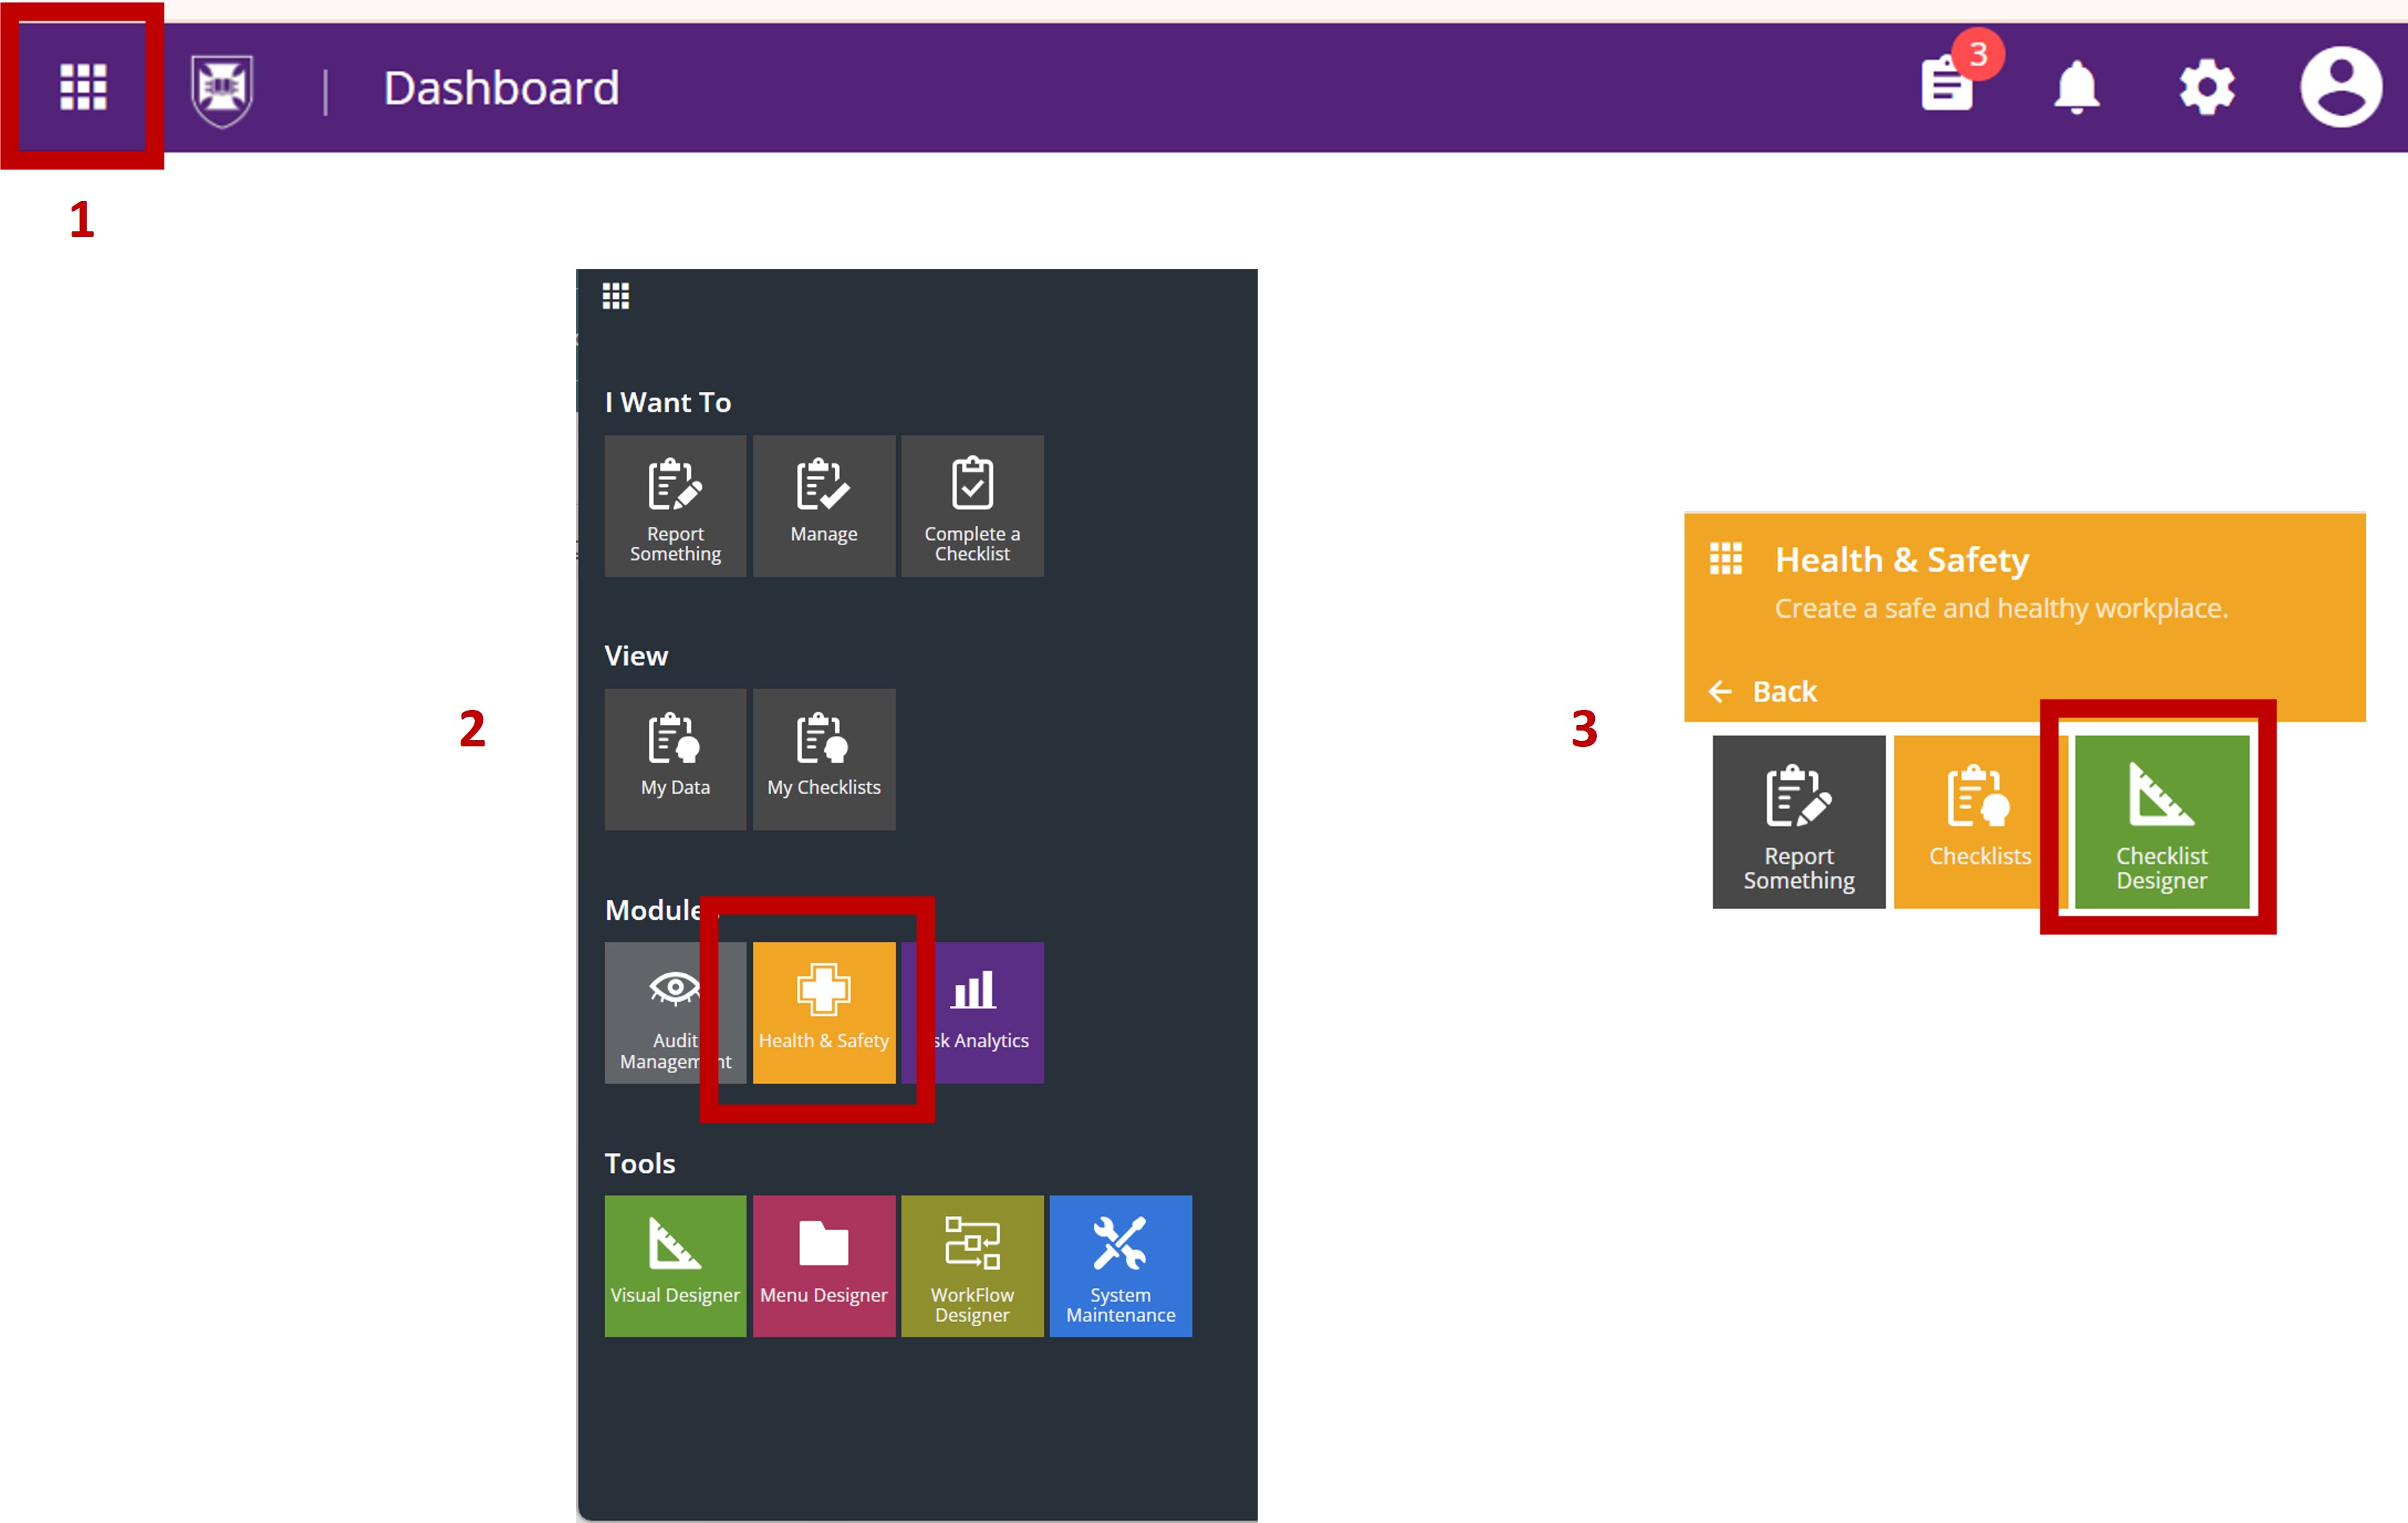
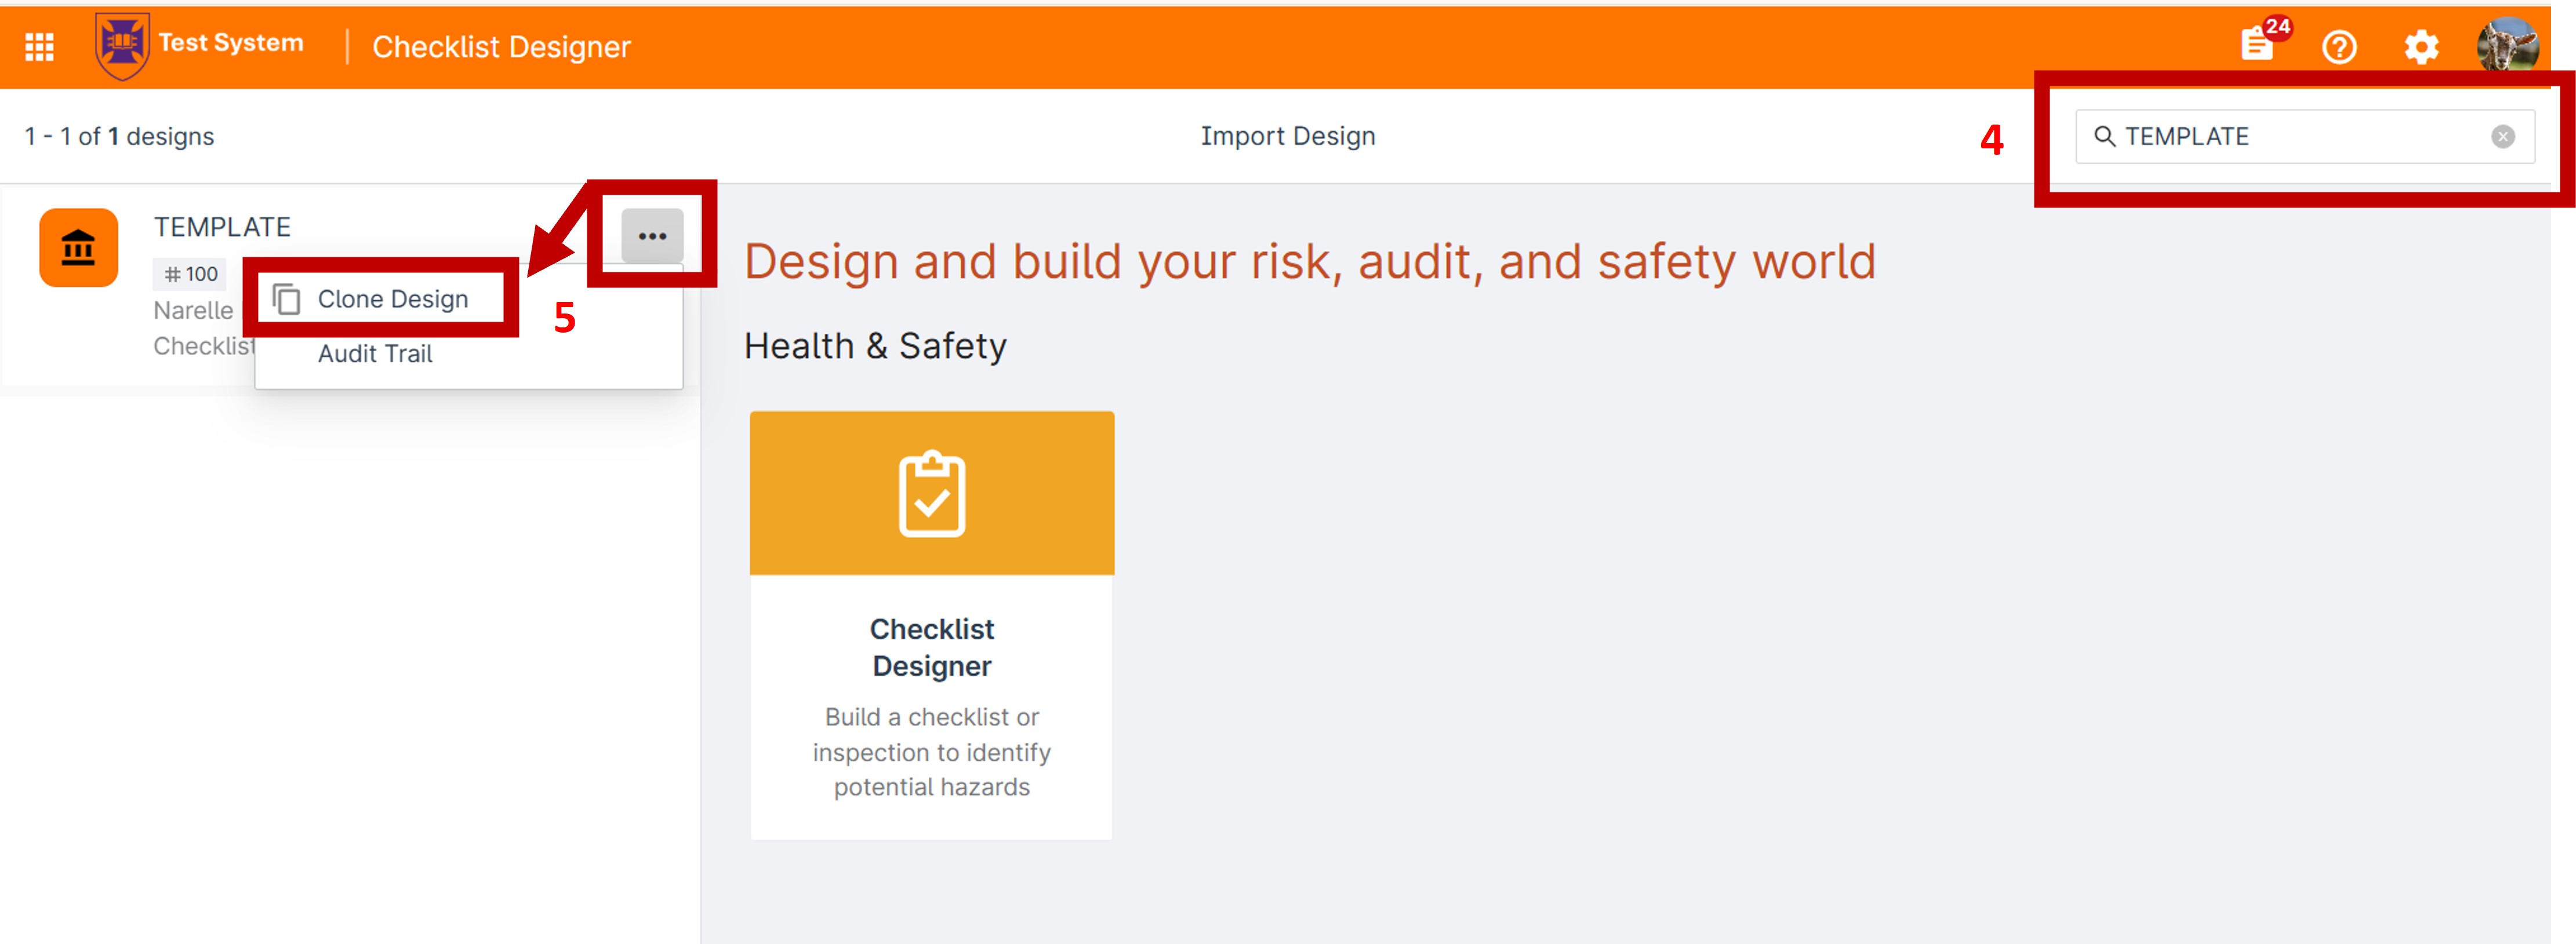
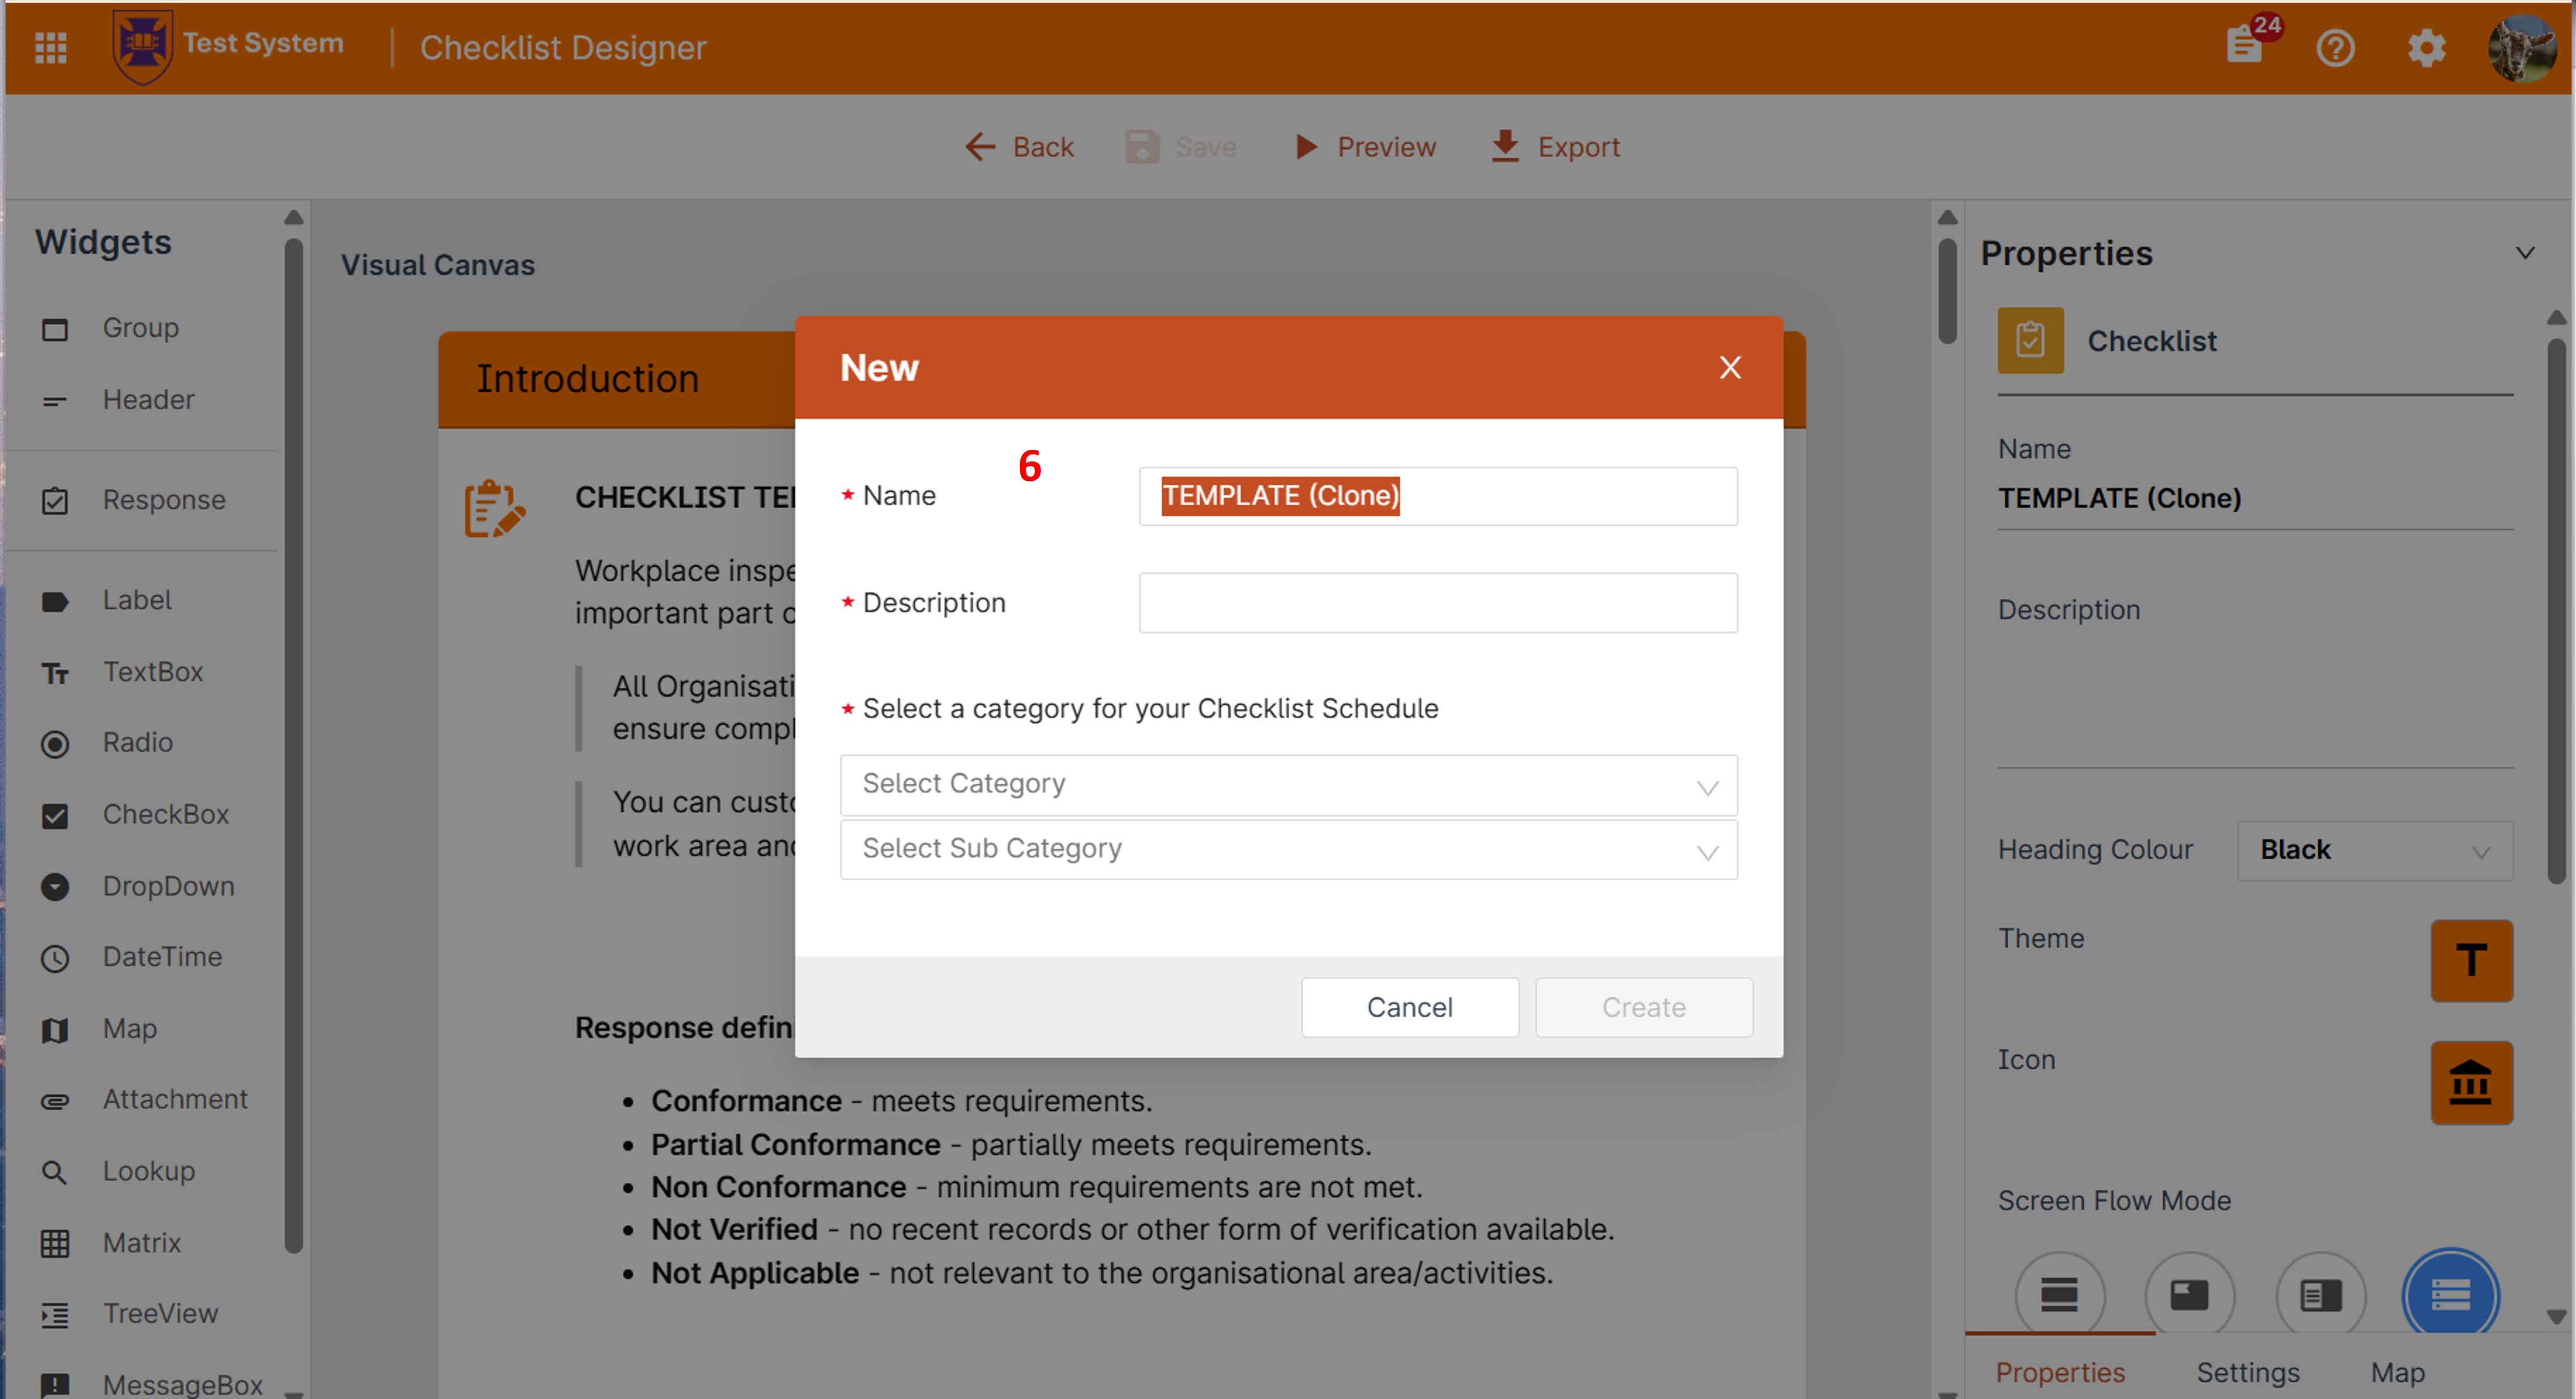
Step 3: Create a new checklist template
Create a new checklist, by cloning the TEMPLATE
- Click the menu (waffle) icon on the global navigation bar
- Navigate to the checklist designer via the Health and Safety tile
- Open the Checklist Designer Module
- Search for 'TEMPLATE' to find a base template to start with
- Create a copy of the template via 'clone'
- Add the name, description and categories for your checklist
* The tiles you see depends on your role and permissions.
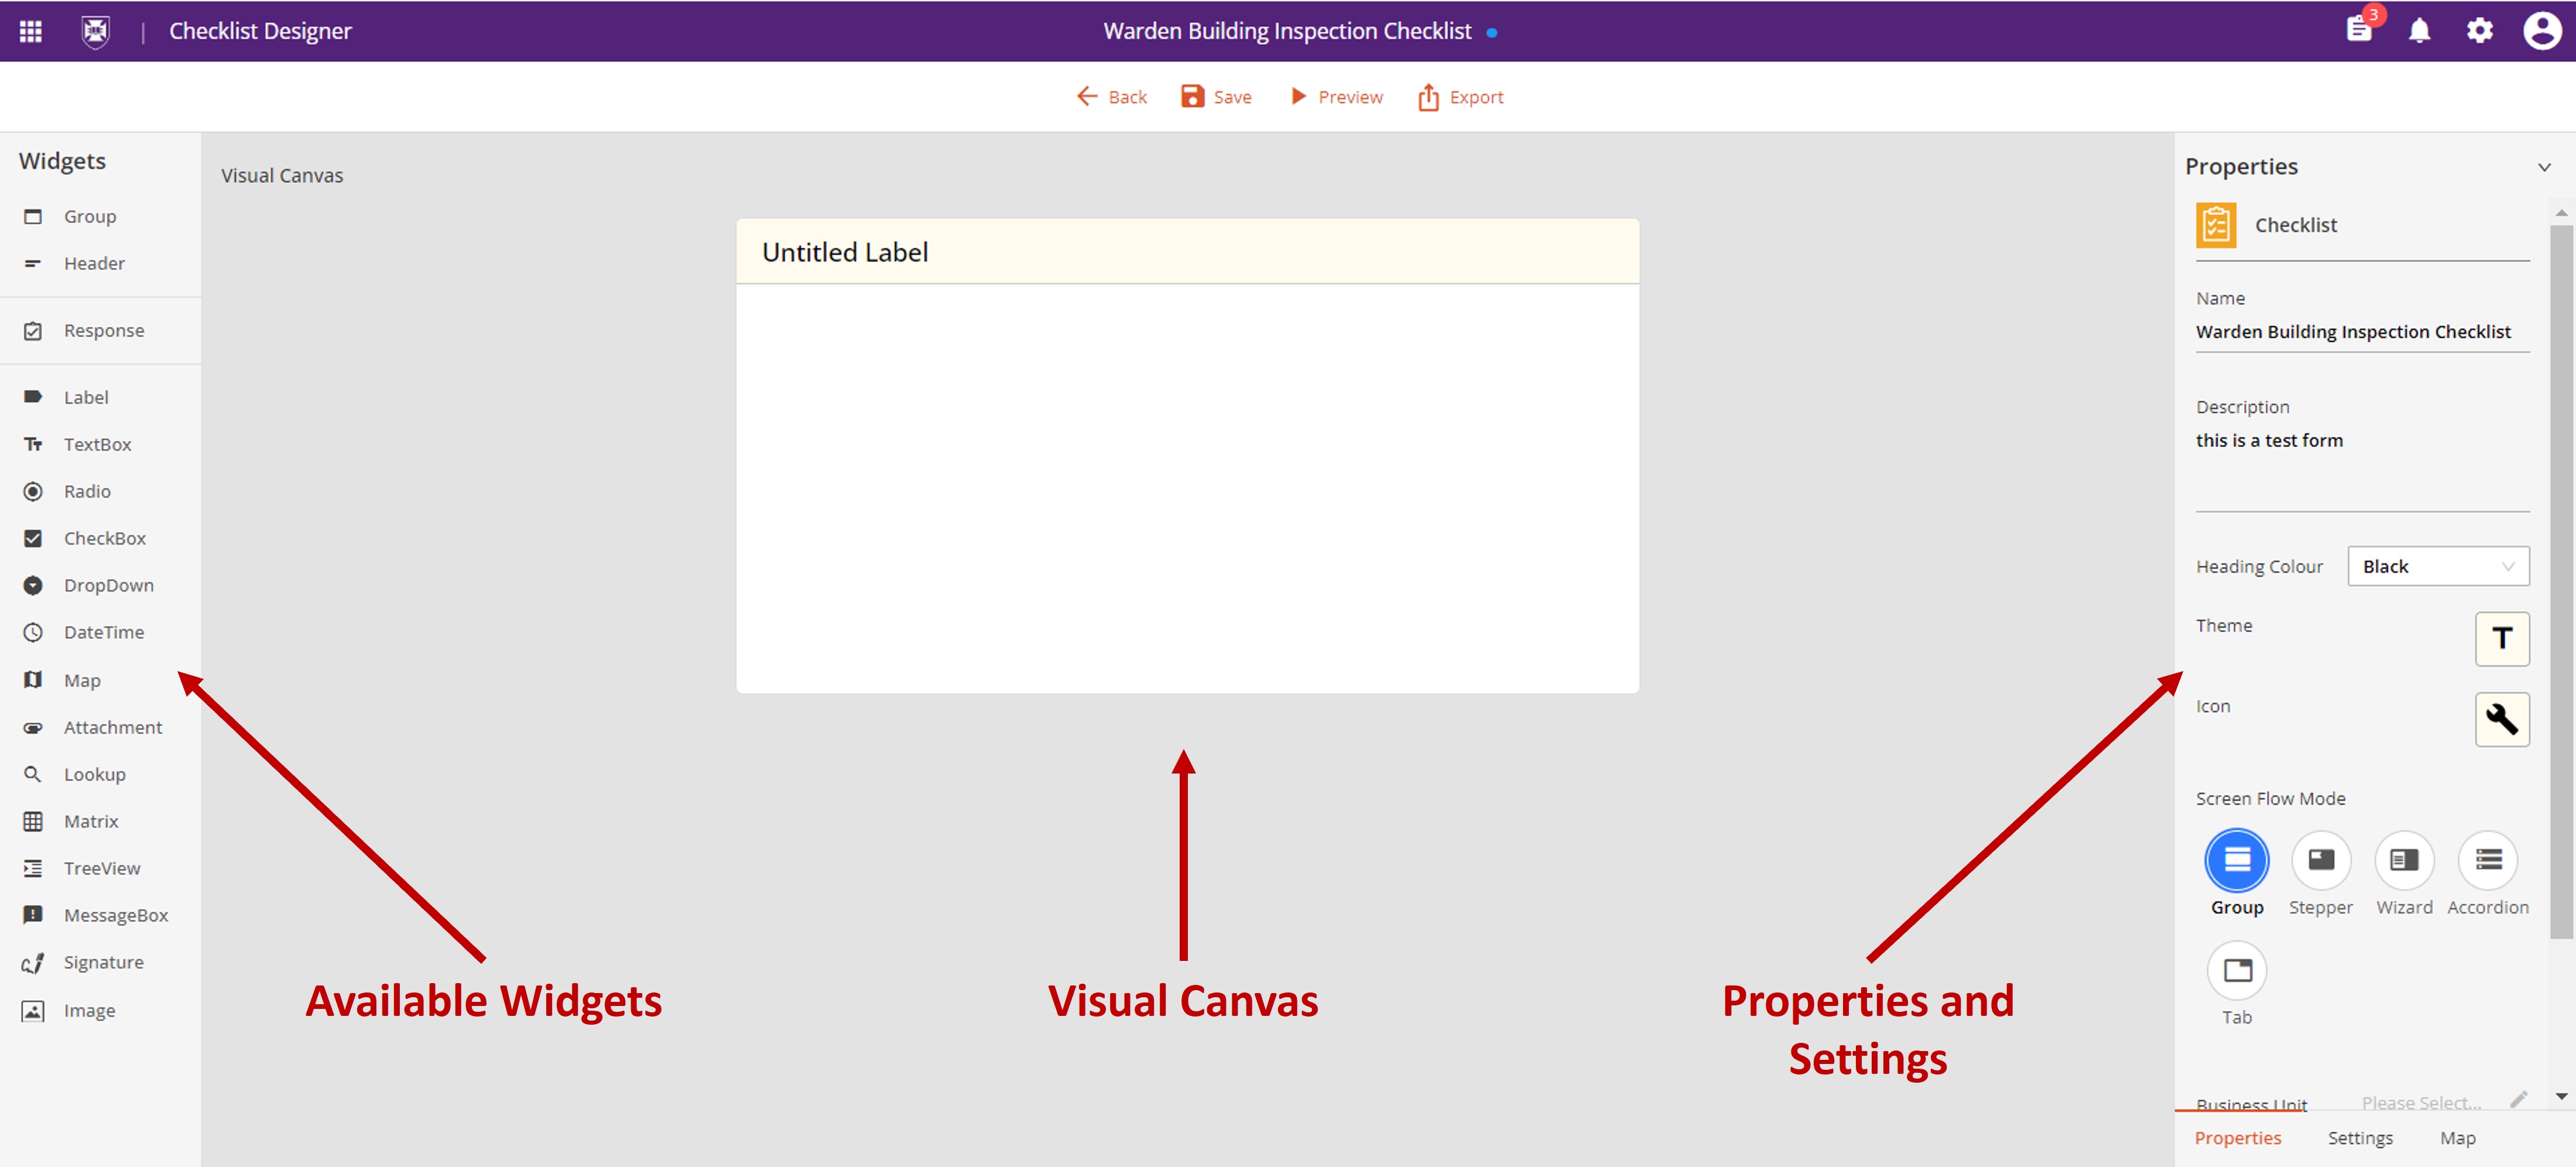
Step 4: Familiarise yourself with the checklist designer tool
| Term | Definition |
|---|---|
| Widget | A component of the Checklist interface enabling a user to perform a specific function |
| Canvas | The working area to design and construct your Checklist Template |
| Properties | Attributes governing the behaviour of the checklist and selected widgets |
Checklist Designer Navigation
| Icon | Description |
|---|---|
 | This returns you back to the Visual Designer menu. Be sure to save your checklist templatebefore clicking back. |
 | Save your checklist template. You should save your checklist regularly to avoid losing your work. |
 | Clone your checklist template. This is very useful if you’re building several similar checklist templates and want to use this one as a base. |
 | Delete your checklist template. You can only delete checklist templates that have not been used to conduct an inspection. |
 | Share your checklist template with other checklist designers. |
 | You need to resync if you’ve made changes to a checklist template that has previously been published.
|
 | Publish changes to your checklist template, when it is ready for people to use to conduct an inspection. |
 | Preview your checklist template without having to publish it. We suggest previewing it for both desktop and mobile. |
 | You can export your checklist template to a file. This file can be imported into a different environment, for example from UAT to production. |
Step 5: Add Groups (Topics)
| Term | Definition |
|---|---|
| Group | A way to organise collections of 'like' information and questions, in a logical collection, often based on topic. |
- Drag and drop Groups onto the Canvas
- Rename your Groups to a meaningful name
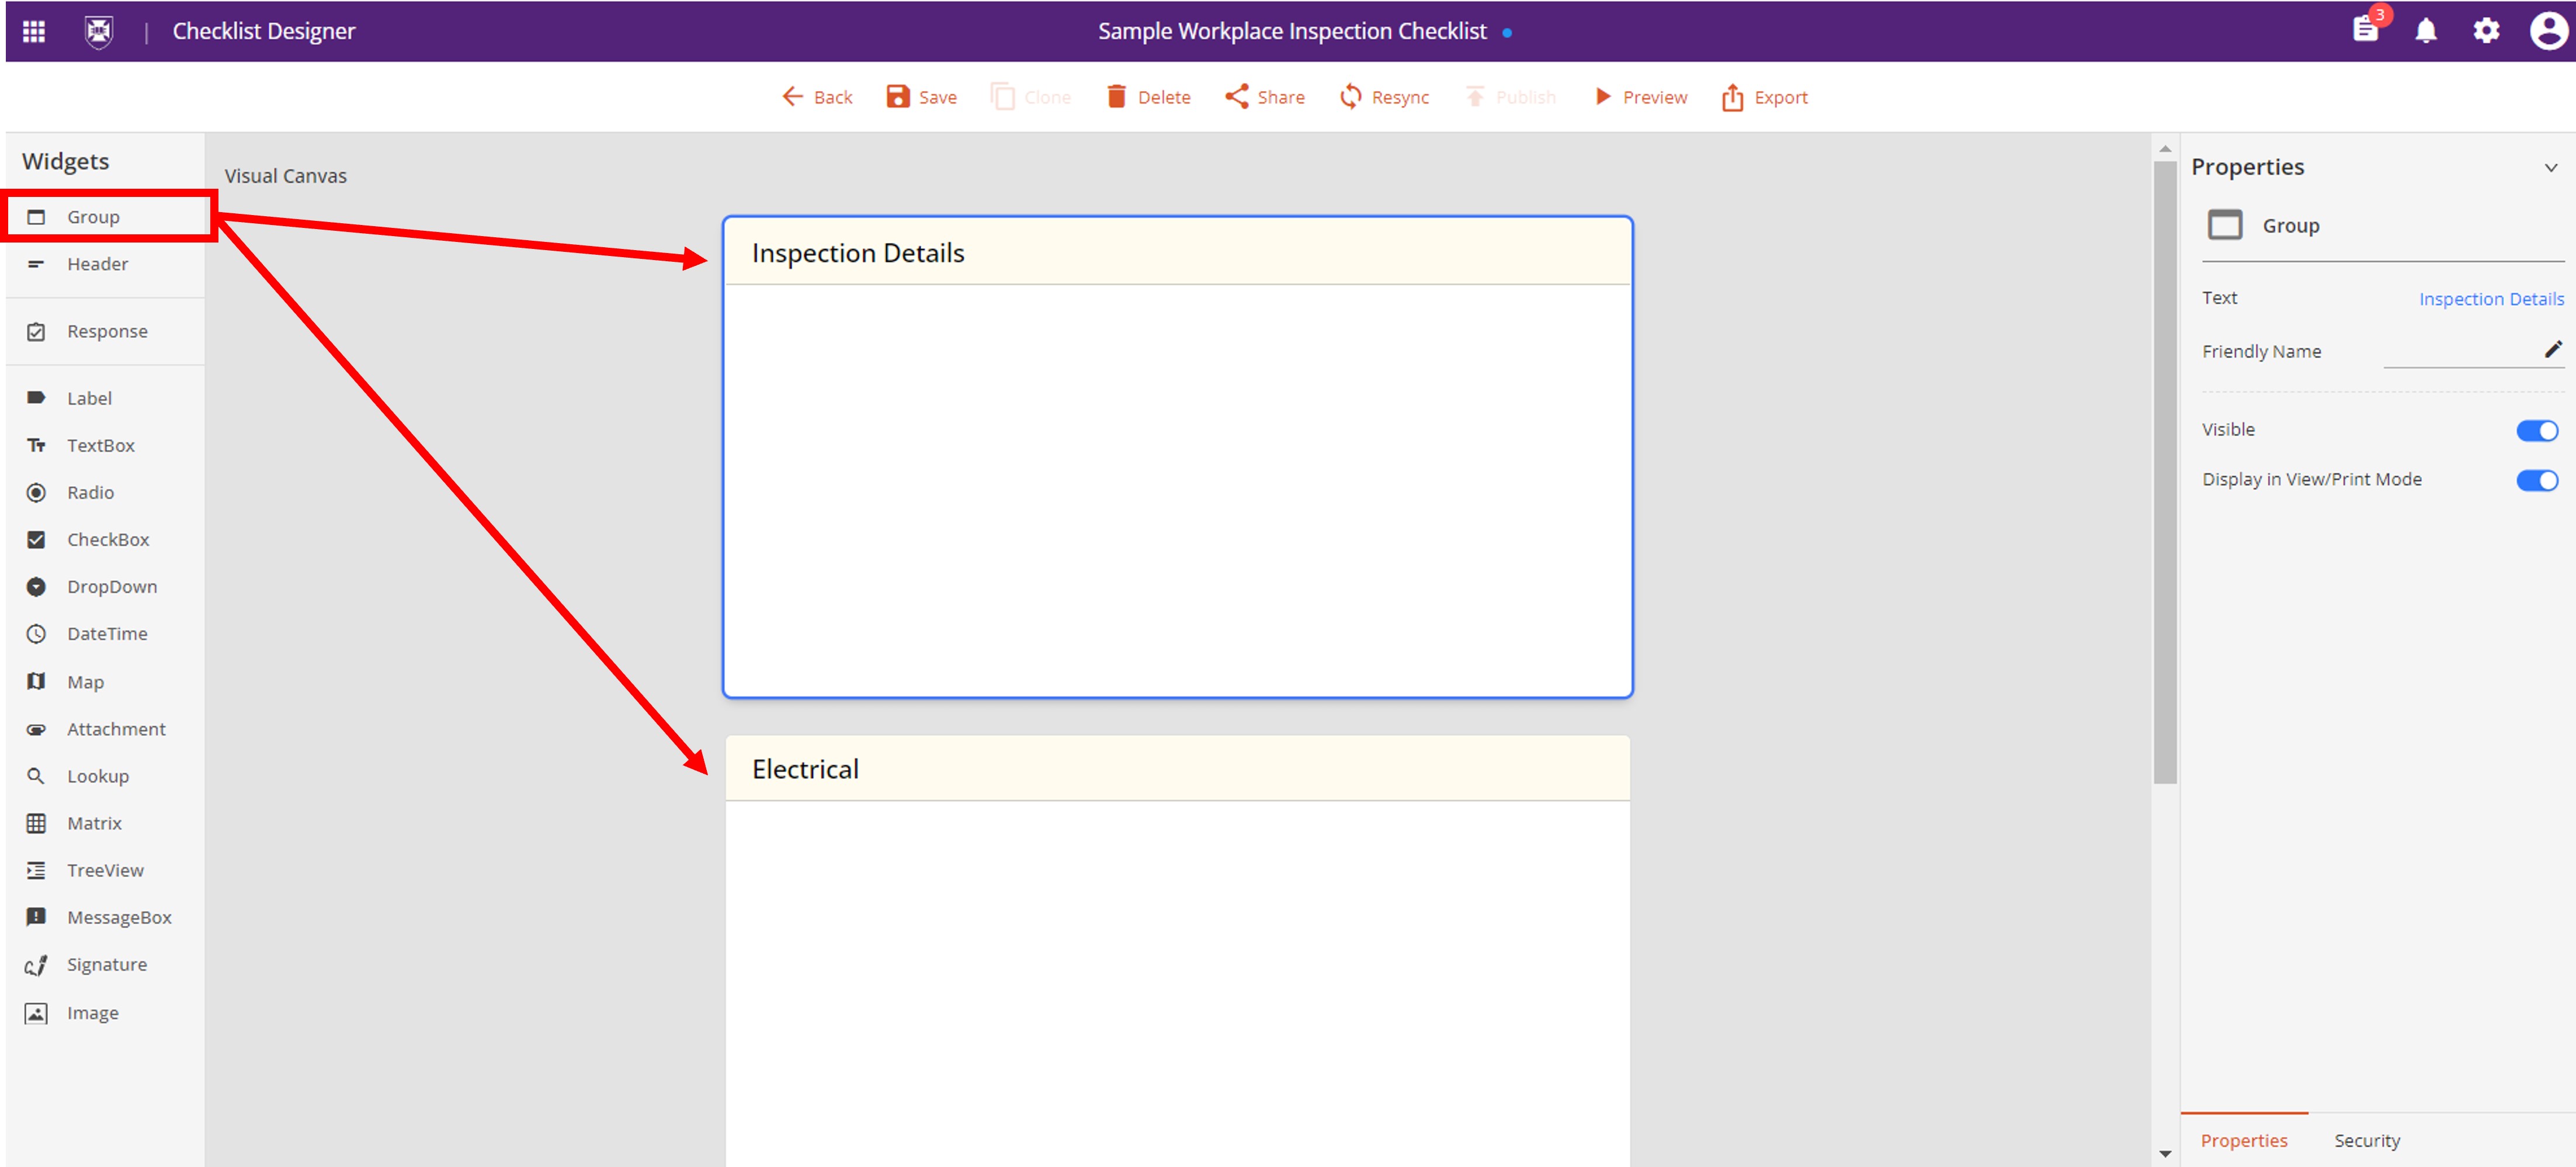
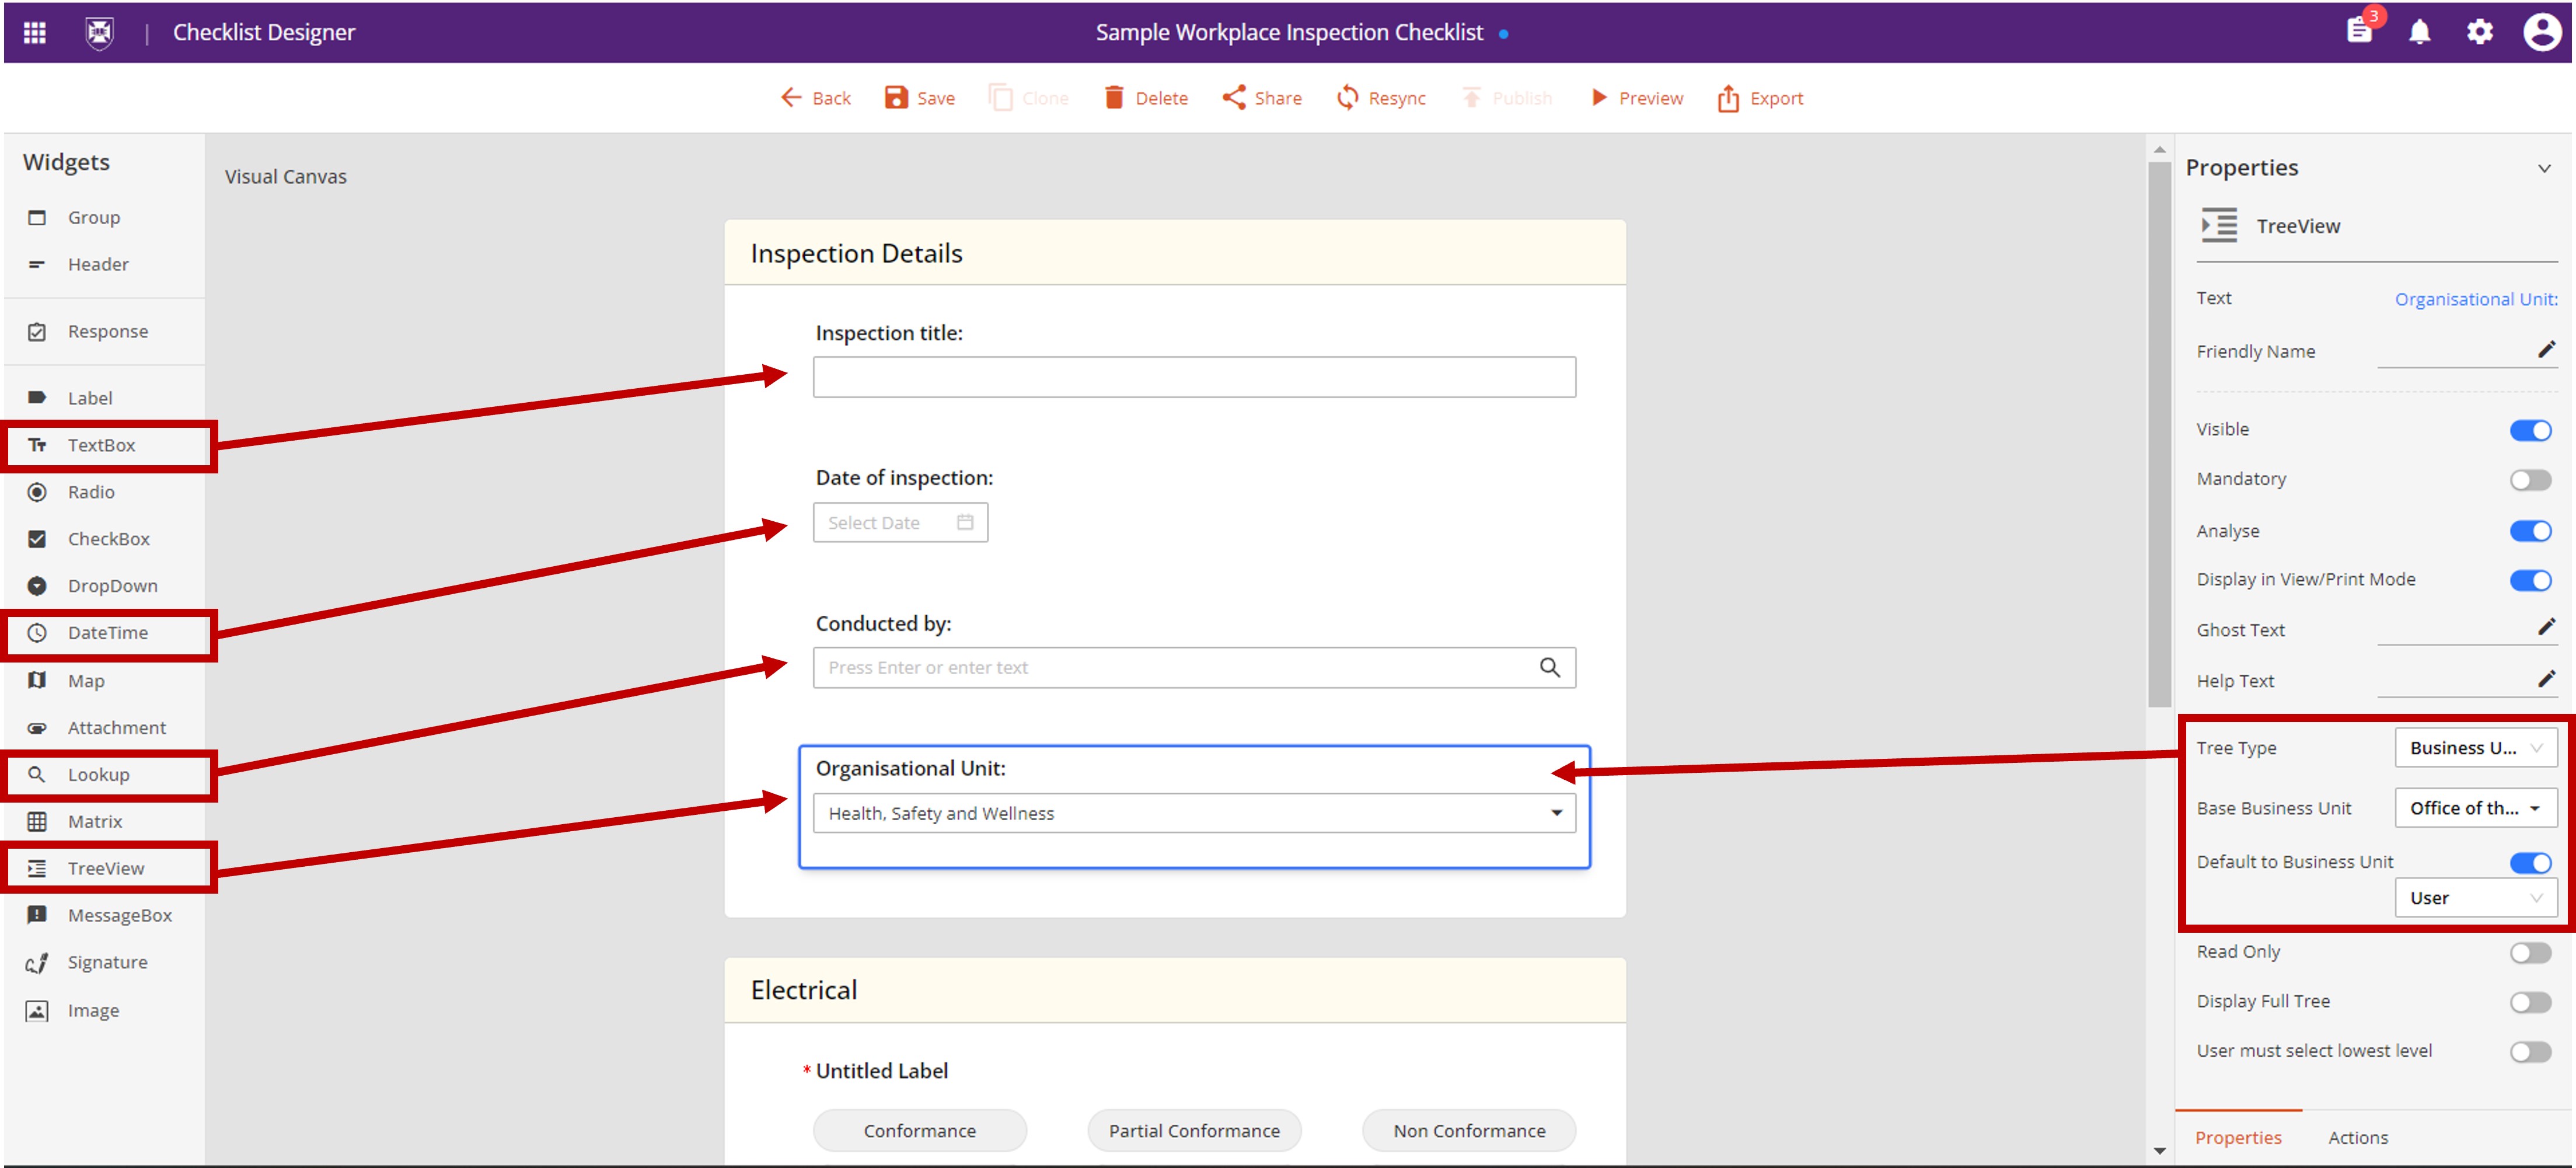
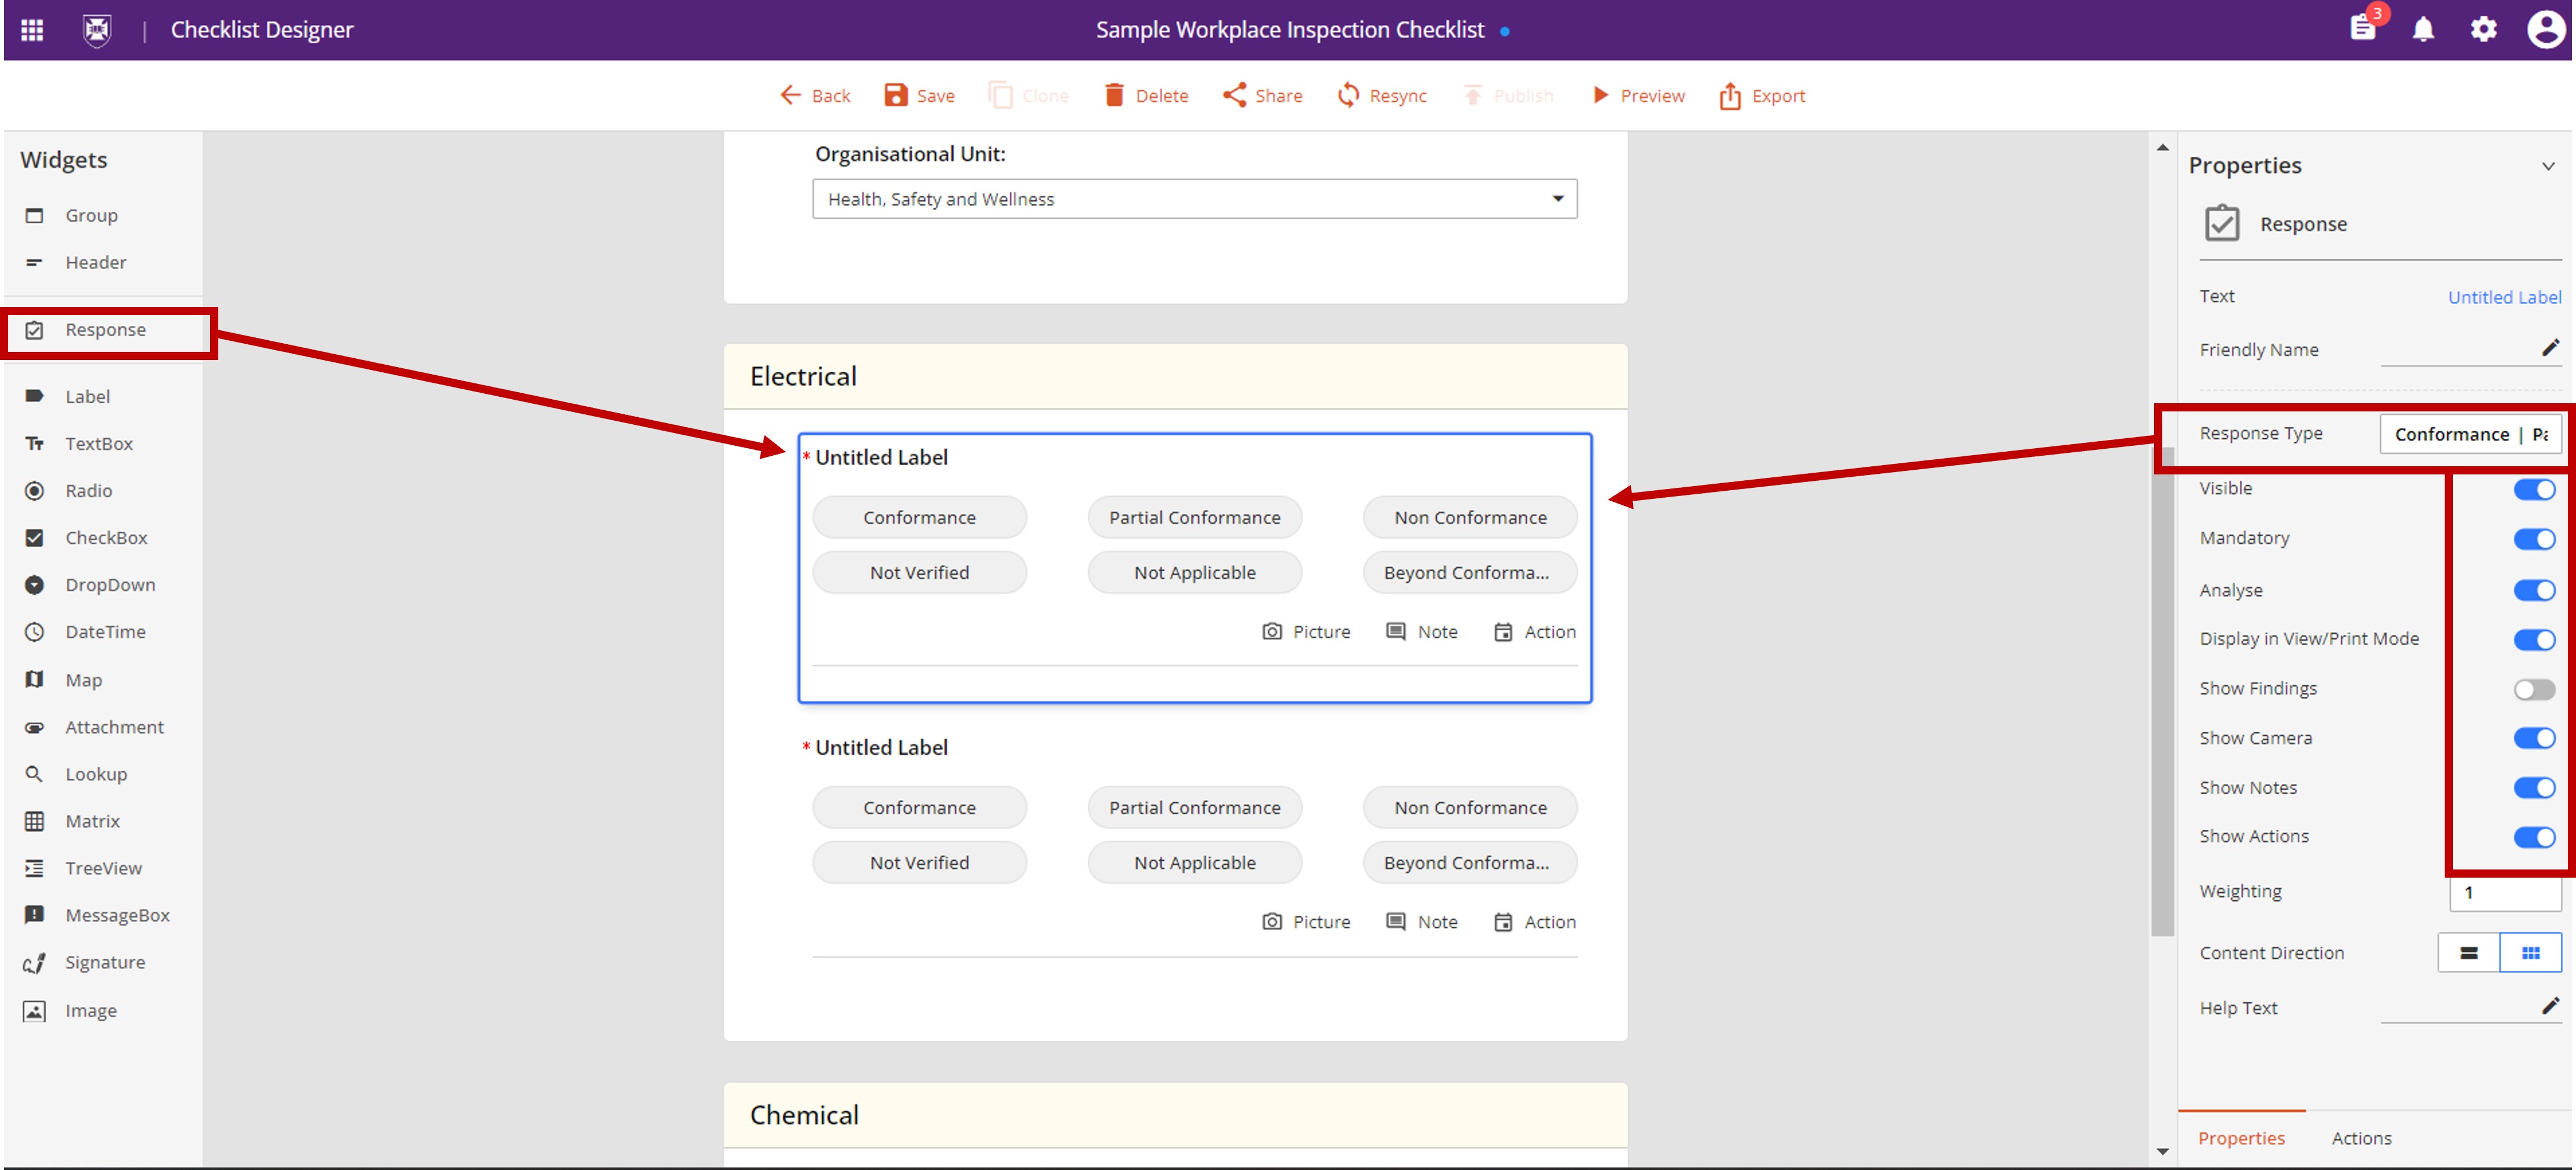
Step 6: Add Widgets and Questions
| Term | Definition |
|---|---|
| Information Widgets | eg Date; Org Unit; Person; Location |
| Response Widgets | Questions |
- Drag and drop widgets from the left hand menu into the relevant group
- Set the required properites from the right hand menu for each individual widget
Information Widgets
Note: Information widgets require a 'friendly name' for them to appear in registers and analytics.
Response Widgets (Questions)
For consistency across our checklists, and to ensure the analytics work as designed, please use the default response types avaialble.
If you do require a beskpoke response type, you will need to request the SysAdmin team create it for you. Email: uqsafe@uq.edu.au
Step 7: Apply conditional logic
| Term | Definition |
|---|---|
| Conditional Logic | A feature that lets you easily show or hide questions based on how someone responds to other questions. This feature is also referred to as conditional branching, where certain questions will branch from others based on the conditions and logic you set. |
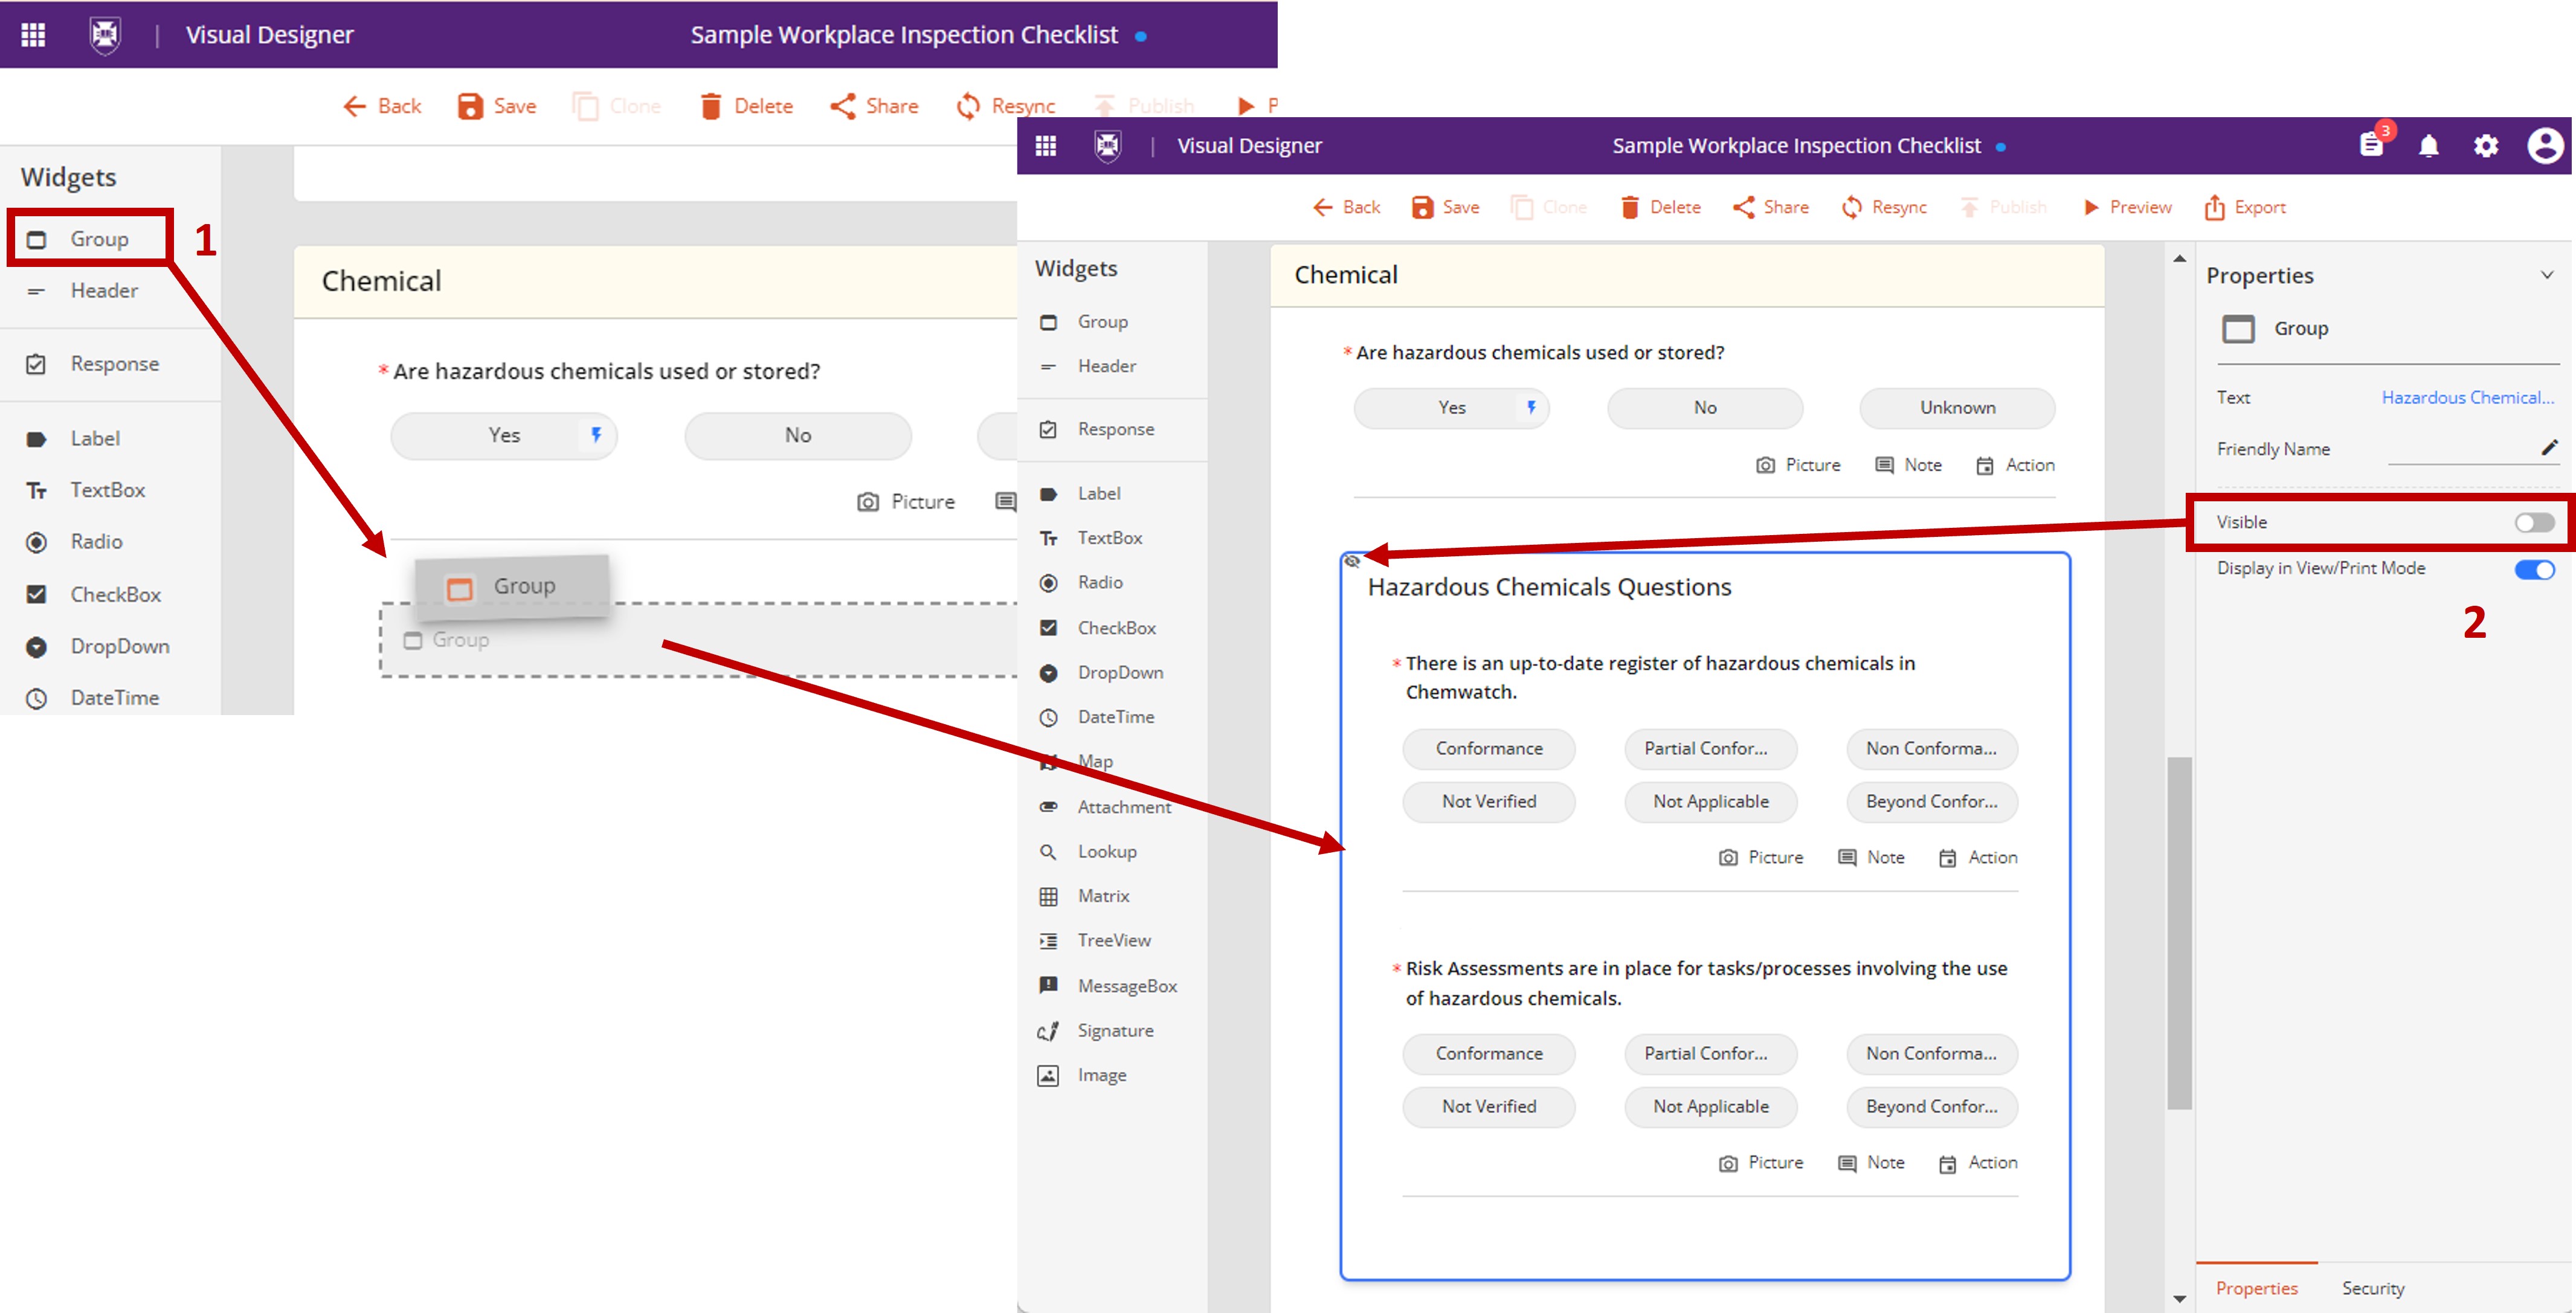
Example: display additional questions, based on the response to a previous question
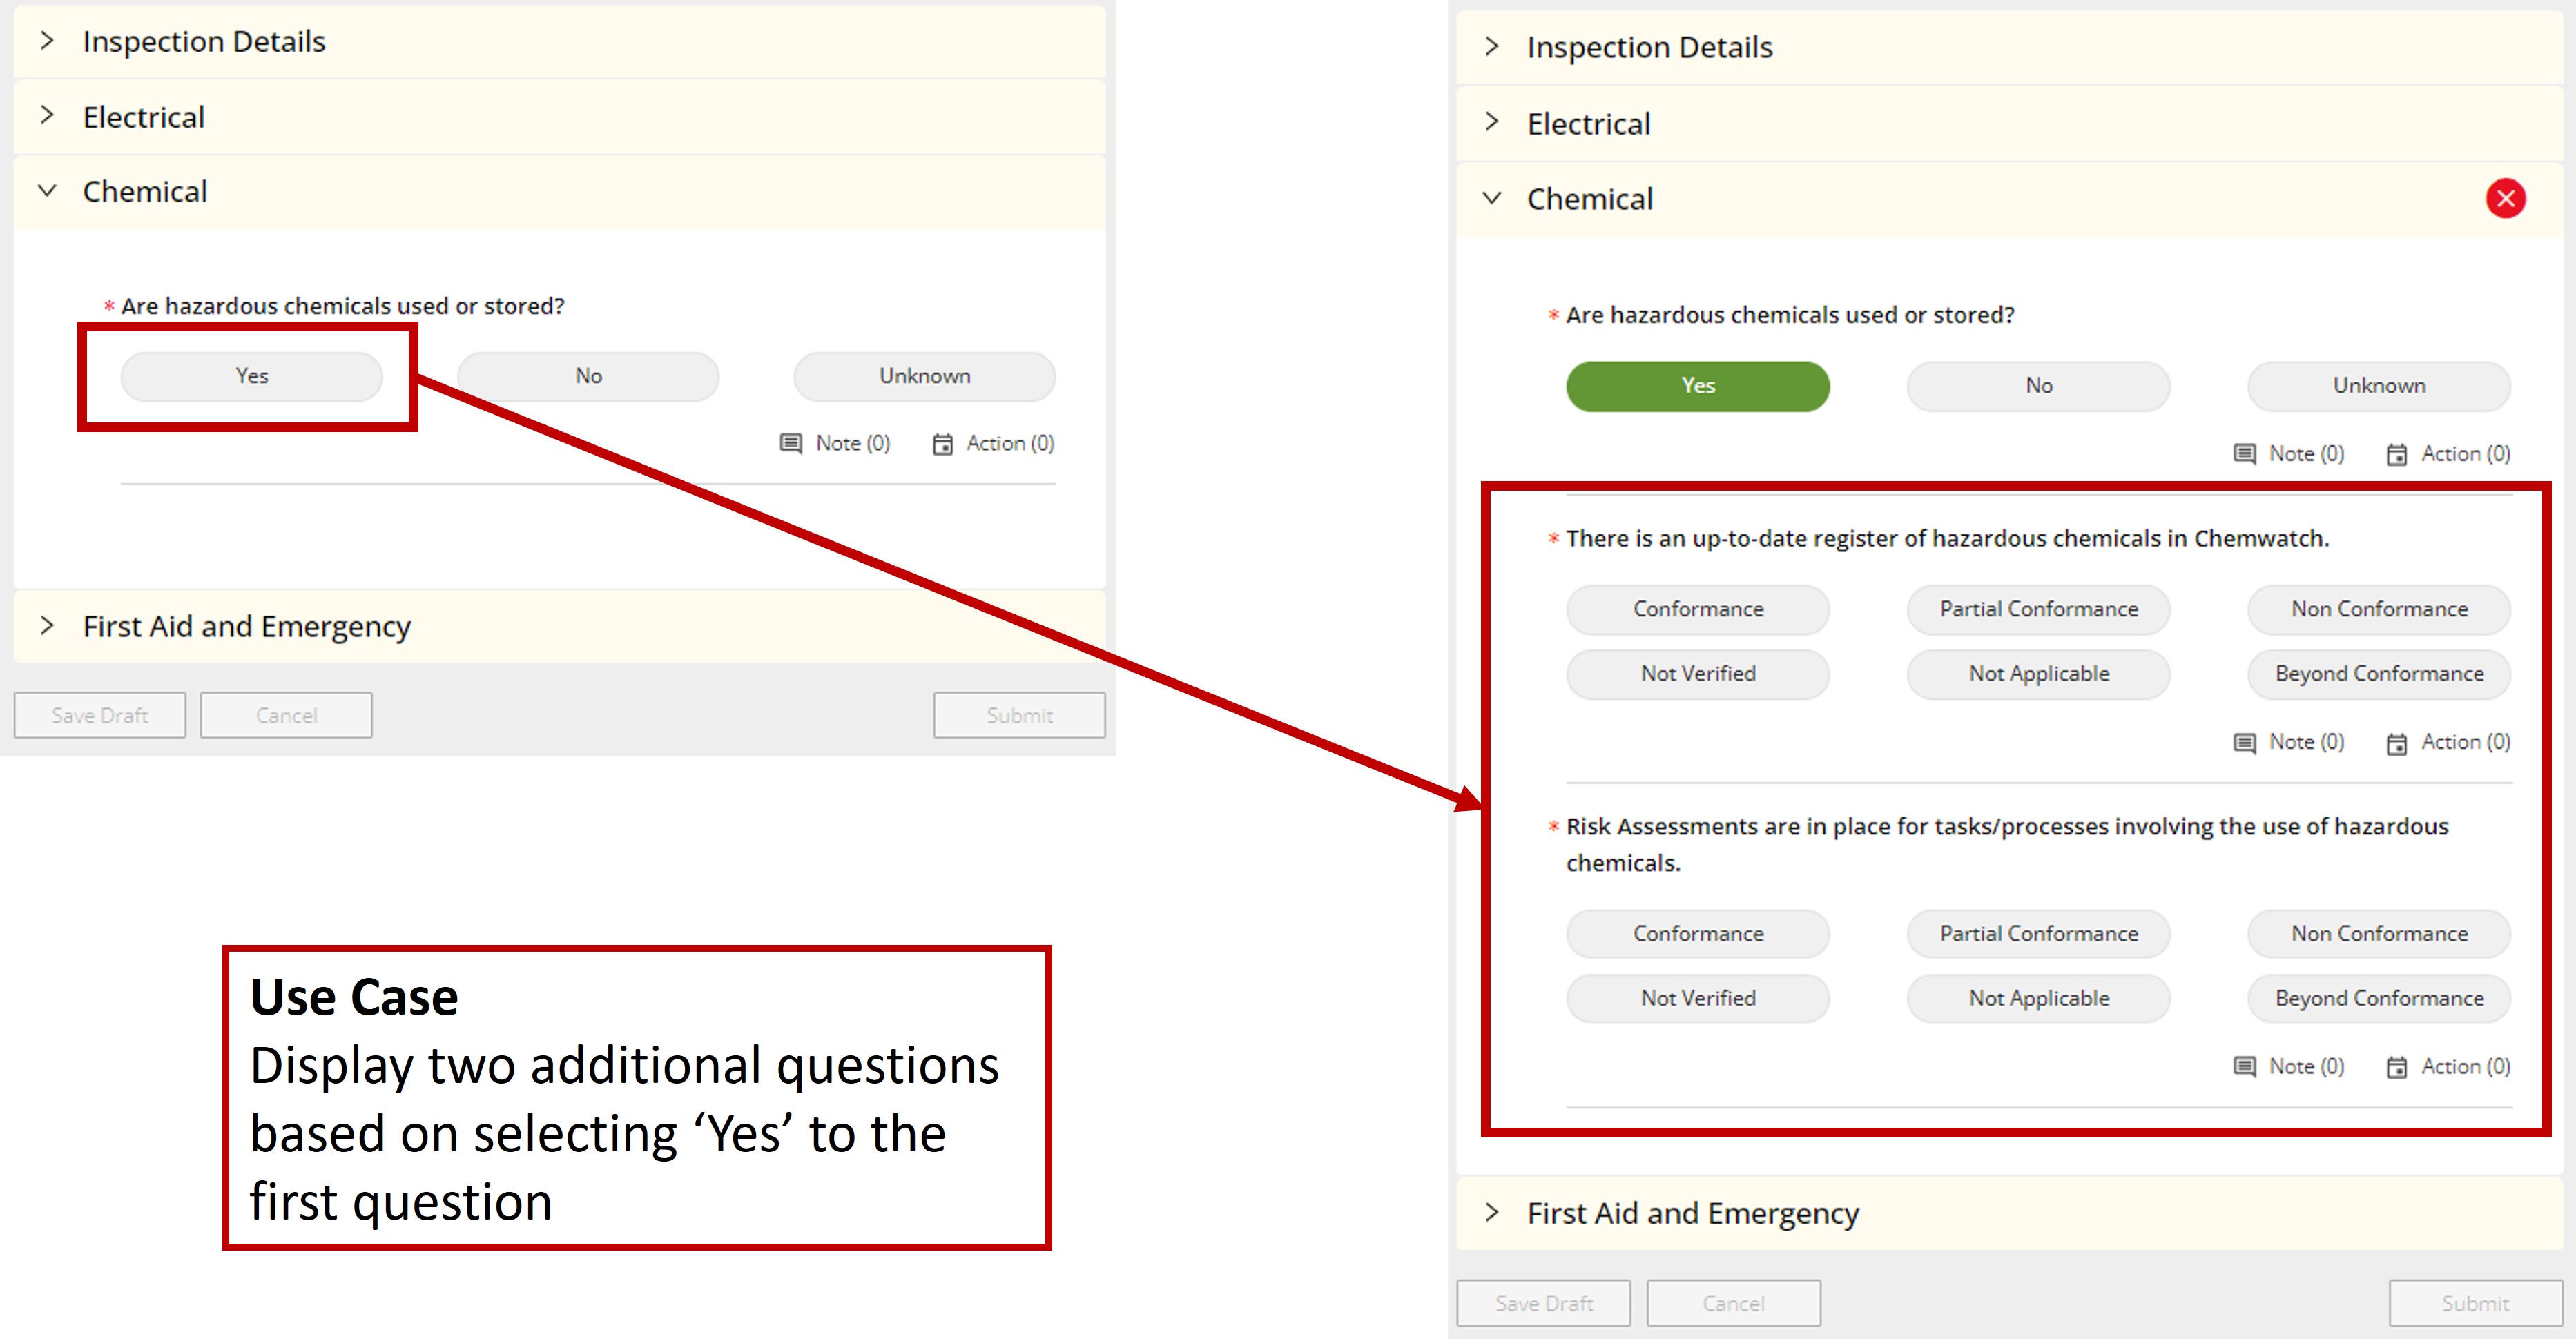
Steps for setting up Conditional logic
- Create a sub-group (a group within a group) for the collective set of questions
- Hide the sub-group by setting the Visible property to off
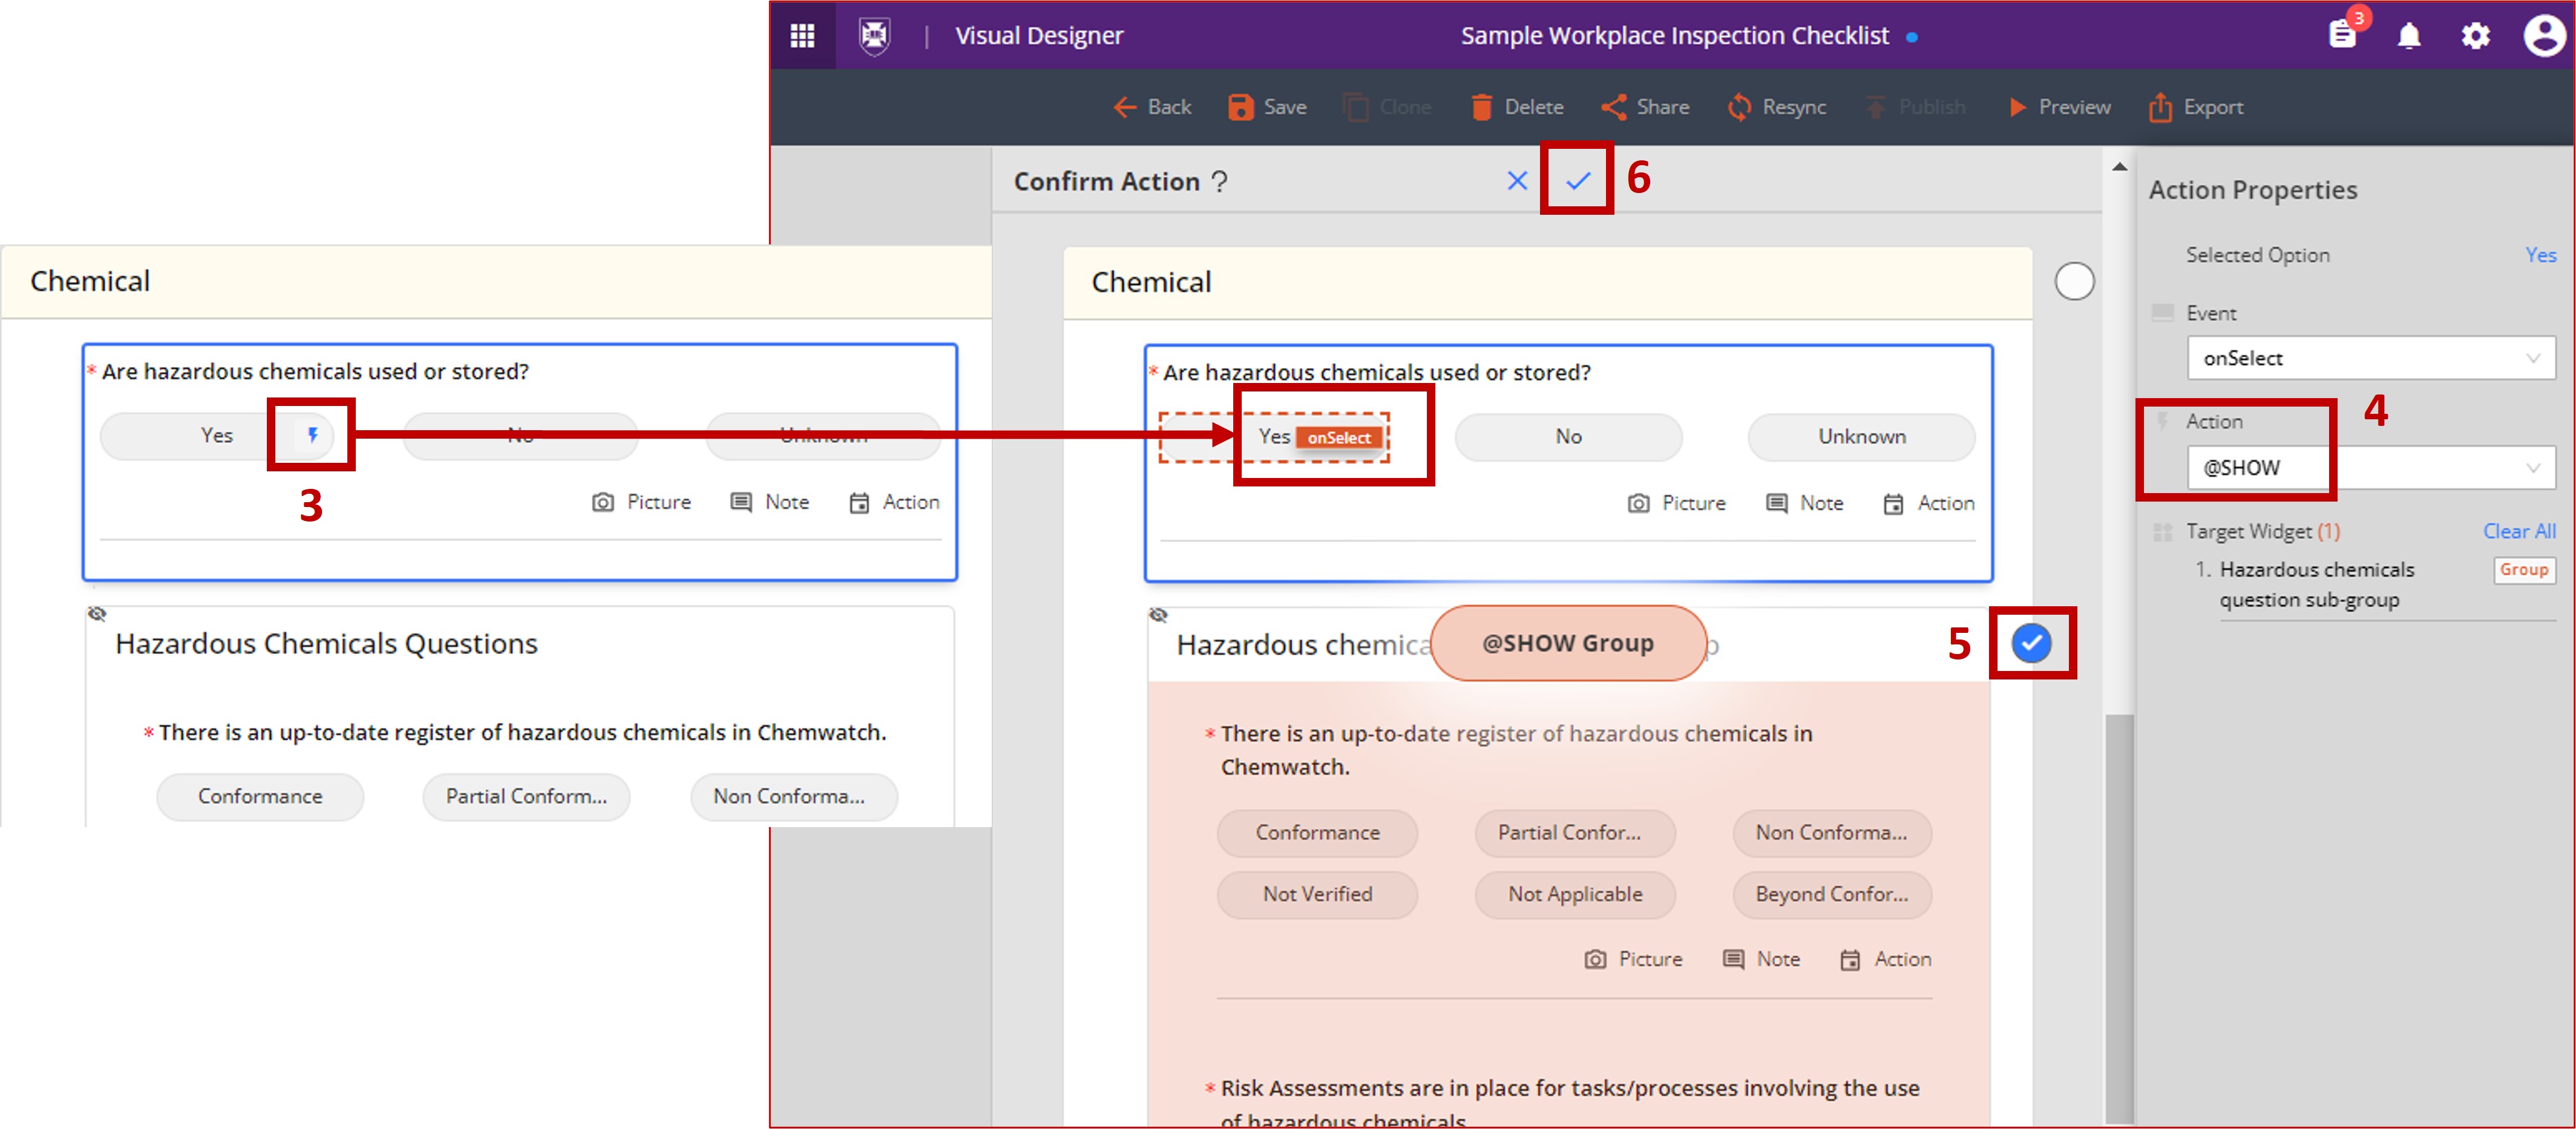
- Click the Action icon (blue lightning bolt) on the response that the conditional logic will apply to
- In the relevant Widget's Action Properties menu, ensure the @SHOW action is selected
- Select the sub-group of questions that you want to show (make visible) when the response is selected
- Save by clicking the tick icon
Step 8: Configure your checklist template
You can choose how your checklist looks, behaves and connects to other parts of UQSafe (RiskWare), such as tasks and registers. The settings are over 3 tabs: properties, settings, and map.
Properties
| Properties | Action |
|---|---|
| Name and description | You can change the name and description here. Remember to keep them detailed to show what they are for |
| Heading colour, theme, icon | Choose how your checklist looks. Be sure to choose colour combinations that are easy to read |
| Screen flow mode | If your checklist is long, you can break it into groups or sections to make it easier to complete |
| Organisational Unit | Restrict the checklist to a single business unit |
| Organisational role | Restrict the checklist to a single organisational role, like auditor or safety manager |
| Display order | Choose a low number to place this checklist higher in the Complete a Checklist menu |
Settings
These settings apply to the entire checklist. You can override default settings for individual questions in their widget
| Settings | Action |
|---|---|
| Pass mark | The pass score needed for this checklist. Scoring allows you to monitor compliance over time. |
| Action plan required for false answers | This enables actions to be able to be created and assigned to resolve issues and hazards identified during an inspection. |
| Show findings | Display a text box to add more information while completing a checklist. |
| Show camera | Let people conducting a checklist with the RiskWare mobile app take a photo. |
| Show notes | Gives an option to attach files to the question. |
| Show actions | Lets the person conducting the audit create an action or task for someone else to complete. |
| Action plan | These set details for the action plan, if chosen. |
| Default response type | This is for response widgets. |
| Category | Determines who can view and use your checklist template, once it has been published. The categories available to you depends on your permissions. |
| Subcategory | Determines who can view and use your checklist template, once it has been published. The sub-categories available to you depends on your permissions. |
Map widgets to their data type in the registers
Choose how you want the information to appear in your registers, when an inspection is conducted using your checklist template. Map widgets to their data type in the registers.
You can only configure and map data before any inspections have been conducted using your checklist template. This ensures the information is mapped consistently.
| Type | Widget (from UQ template) |
|---|---|
| Actions Taken | n/a |
| Assigned To | 'Checklist Owner' |
| Business Unit | 'Organisational Unit' |
| Date | 'Inspection Date' |
| Description | 'Location Description' |
| Location | 'On Campus Location' |
| Title | 'Inspection Title' |
Step 9: Spruce up your checklist template
Select an appropriate,
- Icon for the Checklist Template
- Theme and colour for the Checklist Template
- Icon for each Group within the Checklist Template
Step 10: User Acceptance Testing (UAT)
- Contact the UQSafe SysAdmin team to review and publish your checklist.
- Email: uqsafe@uq.edu.au
- Once reviewed, your template will be added to the 'Complete a Checklist' menu for testing
- Conduct user testing to ensure your checklist is working as expected, and meets requirement.
- Your checklist must be fully completed at least 5 times.
- Review the registers, to ensure all fields are being populated with data.
- Review the analytics, to verify that the scoring is calculating correctly.
Step 11: Submit a ticket to have your checklist published
Only the HSW Division can publish new inspection templates in the UQSafe live (production) environment.
- Contact the UQSafe SysAdmin team to review and publish your checklist.
- Email: uqsafe@uq.edu.au
Questions?
Contact your local Safety Team for assistance with health and safety matters.
Contact the HSW Audit Manager for assistance with audits and inspections.
Contact the UQSafe System Administrators for technical support.
Contact the Health, Safety and Wellness Division for general enquiries.
![]() (07) 3365 2365
(07) 3365 2365