Transcribing and recording meetings in Microsoft Teams
Microsoft Teams offers you the ability to easily record and transcribe meetings held in Teams.
This presents an opportunity to improve meeting productivity, saving you from having to manually record notes, timestamps and related details.
UQ Guidance Note regarding the recording of meetings
The Guidance Note on Audio or Video Recording of Work-related Meetings and Discussions [PDF] outlines UQ’s position, excluding the recording of academic lectures and tutorials.
The Guidance Note suggests that, before recording a meeting, staff:
- obtain approval from their supervisor
- obtain informed consent from all meeting participants
- ensure the recording will not infringe on any intellectual property or confidential information rights.
Please refer to the Guidance Note and the Privacy Management Procedure for a complete overview of the relevant university policy.
Transcribing meetings in Teams
The automatic transcription feature in Teams allows you to transcribe a meeting in real-time. This feature is helpful from an accessibility perspective, particularly for users with hearing impairments. The transcript also remains available after the meeting has concluded, allowing it to be used for record-keeping purposes.
How to start transcription in a meeting
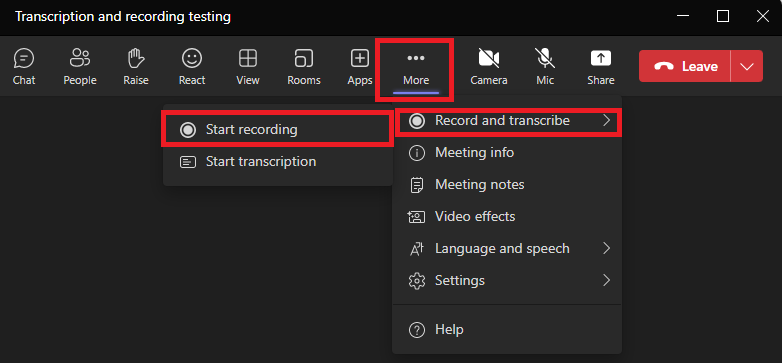
To begin transcription in Teams during a meeting:
- Click on the More icon at the top of the screen (the icon, shown below, is 3 dots)
- Click on the Record and transcribe menu
- Click Start transcription. The transcription will open on the right of the meeting screen.
![]()
The first time you start transcription, you will be asked what language the meeting will be in. If you attend meetings exclusively in English, you can save this setting to prevent the prompt from appearing again.
Accessing a meeting transcript
Once the meeting has concluded, the transcription will be available to view on the Recordings & Transcript tab. You can download the transcript by opening the chat and selecting Download.
Recording Meetings in Teams
A meeting recording can be helpful for a variety of reasons, including catching up invitees who were unable to attend live and record-keeping for long-running meeting series.
How to start recording a meeting
To begin recording in Teams during a meeting:
- Click on the More icon at the top of the screen (the icon is 3 dots, next to the camera icon)
- Click on the Record and transcribe menu
- Click Start recording
- The recording will automatically finish once the meeting ends.
Where does the meeting save?
Once the recording has finished, it will be accessible from the meeting Chat as well as the Files tab.
Meeting recordings are also accessible under Microsoft Stream via https://m365.cloud.microsoft/launch/Stream/?auth=2.
Where the meeting is saved will depend on whether the meeting was held in a channel.
- If the meeting was in a channel, the recording will be saved within the channel’s SharePoint folder.
- If the meeting was not held in a channel, the file is saved to the OneDrive of the user who started the recording. The recording will be accessible in the OneDrive directory within the Recordings folder. For example, if you are using a UQ PC the file pathway would be C:\Users\[your username]\OneDrive - The University of Queensland\Recordings.
When does the meeting expire?
All Teams recordings will expire after 60 days by default. At that time, meetings will be moved to the Recycle Bin. You should also receive an email reminder when the recording is getting close to expiration. If this is not actioned, the recording will not able to be recovered.
For recordings with different requirements, the default expiration policy can be changed.
In the meeting chat click the link underneath the recording – pictured below.
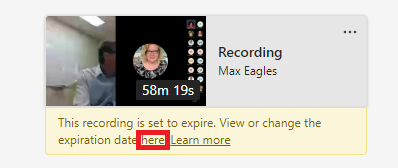
On the video webpage, the 60-day expirationisdisplayed next to the recording date. Click the expiration countdown to either extend, select, or remove expiration from the recording.
Utilising meeting recordings and transcriptions
The recording and transcription features of Teams lend themselves to many use cases, in addition to the accessibility advantages mentioned earlier.
- When hosting an informational session in Teams, such as a webinar, recording the session offers you the opportunity to share the video, for example via email or a webpage.
- Turning transcription on makes it easy for users to review what was said in the meeting, including using search to find specific sections quickly. Specific statements or sections of the meeting can then be copied straight from the transcript as required, eliminating the need to manually transcribe or reproduce what was said.
- A recording or transcription of a meeting offers an easy method of meeting any compliance or recordkeeping requirements. The transcript and the recording can be used to refer back to what was discussed in the meeting and to ensure action items or decisions are followed up.
These are just some of the possible uses of these features. If you have found a use for transcription and recording that improves your productivity, please share it with our Productivity Tips group.