EZOffice
EZOffice is an asset tracking and loan management system. This is a guide to the basic administrative functions of the EZOffice service.
Accessing EZOffice
UQ's EZOffice service is accessible at https://universityqueensland.ezofficeinventory.com
If your team requires access to the EZOffice service or you require further information, please submit an EZOfficeInventory request (staff login required).
Members
The users of EZOffice are referred to as Members. Members are placed in to the relevant Team for their school or faculty.
The level of access available to a Member is defined by their Role. By default, each Team will contain two Roles:
- Admins: The administrative staff who regularly log in to EZOffice to manage operations such as creating and checking out assets that belong to their school or faculty.
- Members: Staff and students that assets are checked out to, who do not need to log in to EZOffice.
Adding a new Member
Follow these steps to add a new member who will require no login access to EZOffice.
- Click the 'Members' menu icon to access a list of members within your Team.

- Click the 'Add Member' button at the top right of the interface.

- Configure the three tick boxes as per below:
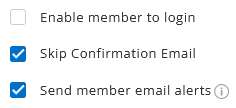
- Configure the following essential fields:
- Email: Add the member’s UQ email address.
- Role: Set this field to match the <TEAM NAME> Members Role for your Team. Please ensure that you are not adding the member to the Admins Role for your Team.
- First Name
- Last Name
- Identification Number: Add the member’s UQ username to this field.
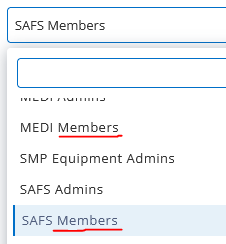
- Team: Select the name of your Team within the list.
- The remaining fields are optional. Please update any additional fields your School or Faculty may require to help keep track of Members within your Team.
- Click the blue 'Done' button at the top right of the interface to create the new member. Please note that it may take up to 2 minutes for the new member to be created. Wait until the page has refreshed to confirm that the new member has been created successfully.
If you need to import a large number of Members as a bulk operation, please submit an EZOfficeInventory request (staff login required).
Adding a new Admin
Follow these steps to add a new administrative staff member to your Team:
- Click the 'Members' menu icon to access a list of members within your Team.
- Click the 'Add Member' button at the top right of the interface.
- Configure the three tick boxes as per below:
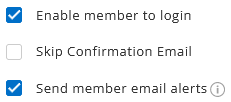
- Configure the following essential fields:
- Email: Add the member’s UQ email address.
- Role: Set this field to match the <TEAM NAME> Admins Role for your Team.
- First Name
- Last Name
- Identification Number: Add the member’s UQ username to this field.
- Team: Select the name of your Team within the list.
- The remaining fields are optional. Please update any additional fields your School or Faculty may require.
- Click the blue 'Done' button at the top right of the interface to create the new admin member. Please note that it may take up to 2 minutes for the new member to be created. Wait until the page has refreshed to confirm that the new admin member has been created successfully.
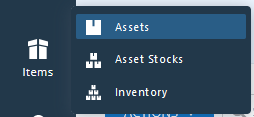
Assets
Assets are the items tracked and checked out to members within EZOffice. Three types of Asset categories are available:
- Assets: Handle assets that need to be tracked individually, such as laptops and scientific equipment.
- Asset Stock: Handle multiples of assets that do not need to be tracked invidually, such as lab coats and cables.
- Inventory: Track consumable items such as gloves and face masks.
Checking out an Asset
Follow these steps to check out one or more Assets to a Member:
- Mouse-over the 'Items' menu icon, then click on the relevant Asset type.
- Locate the required Asset(s) within the list. You can use the search bar to help locate a specific Asset.

- Tick the required Asset/s within the list. You can select more than one asset if checking out multiple Assets to a single Member.

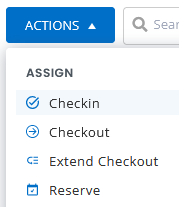
- Click the blue 'Actions' button, then click 'Checkout'.

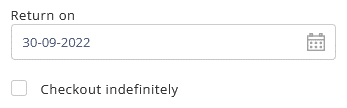
- In the 'Return on' field, set the date on which the Asset(s) should be returned. If Assets are to be checked out for an indefinite period, tick 'Checkout indefinitely'.
- In the 'Checkout to' field, select the required member from the list.
- If the required Member is available within the list, please skip ahead to Step 11 below.
- If the required Member has not yet been created within EZOffice, please proceed to the next step.
- Click the blue plus
 icon next to the 'Checkout to' field.
 - Configure the three tick boxes as per below:
- Configure the following essential fields:
- Email: Add the member’s UQ email address.
- Role: Set this field to match the <TEAM NAME> Members Role for your Team. Please ensure that you are not adding the member to the Admins Role for your Team.
- First Name
- Last Name
- Identification Number: Add the member’s UQ username to this field.
- Team: Select the name of your Team within the list.
- The remaining fields are optional. Please update any additional fields your School or Faculty may require to help keep track of Members within your Team.
- Click the blue 'Create Members' button to create the new Member. Note that it may take up to 2 minutes for the new Member to be created.
- Use the 'Comments' field to add any additional information you may require.
- Click the blue 'Checkout' button to check the Asset(s) out to the Member.
Checking in an Asset
Follow these steps to check in an asset that has been returned:
- Mouse-over the 'Items' menu icon, then click on the relevant Asset type.
- Locate the required Asset(s) within the list. You can use the search bar to help locate a specific Asset.
You can reduce the list down to just checked out assets by clicking the filter option, then 'Checked Out Assets'.
- Tick the required Asset(s) within the list. You can tick more than one asset if checking in multiple Assets.
- Click the blue 'Actions' button, then click 'Checkin'.
Adding a new Asset
Follow these steps to add a new asset to EZOffice.
- Mouse-over the 'Items' menu icon, then click on the relevant Asset type. If you are not sure which to select, please refer to the Assets Overview section of this guide.
- Click the blue 'Add Asset' button at the top right of the interface.
- Within the 'Name' field, add a title for the new asset.
- Within the 'Group' field, select the correct Asset group from the drop-down menu. The available fields will update once a group has been set.
- Update the available fields with the details of the new Asset. The fields marked with a red asterix are mandatory.
- The 'Location' field refers to the storage location of the Asset. If the Location you require is not available within the list, please refer to the 'Locations' section of this guide.
- Click the blue 'Done' button at the top right of the interface to save the new Asset.
If you need to import a large number of Assets as a bulk operation, please submit an EZOfficeInventory request (staff login required).
Retiring an Asset
To retire an asset from EZOffice:
- Mouse-over the 'Items' menu icon, then click on the Asset type for the Asset(s) you want to retire.
- Locate the required Asset(s) within the list. You can use the search bar to help locate a specific Asset.
- Tick the required Asset(s) within the list. You can tick more than one asset if retiring multiple Assets.
- Click on the blue 'Actions' button, then click 'Retire'.
- Select a 'Retire Reason' from the drop-down menu.
- Provide any additional comments required within the 'Comments' field.
- Click the blue 'Retire' button to retire the asset.
Servicing and maintenance
EZOffice can be used to track and schedule servicing and mantenance for your assets.
Start service for an Asset
- Mouse-over the 'Items' menu icon, then click on the relevant Asset type.
- Locate and tick the Asset/s that require immediate servicing.
- Click the blue 'Actions' button, then click 'Start Service'.
- Choose to make the item unavailable during the servcing period, or create a service record to log that servicing has occured.
- Update the available fields as required.
- Click the blue 'Start Service' button.
End service for an Asset
- Mouse-over the 'Items' menu icon, then click on the relevant Asset type.|
- Locate and tick the Asset(s) that have completed servicing. Please note, if you want to track the individual cost of servicing each item, you will need to End Service once asset at a time.
- Click the blue 'Actions' button, then click 'End Service'.
- Update the available fields as required.
- Click the blue 'End Service' button.
Schedule servicing for an Asset
- Mouse-over the 'Items' menu icon, then click on the relevant Asset type.
- Locate and tick the Asset(s) that require servicing to be scheduled.
- Click the blue 'Actions' button, then click 'Schedule Service'.
- Update the available fields as required.
- Click the blue 'Schedule Service' button.
Asset label printing
EZOffice can be used to generate printable Asset labels to help you keep track of your physical assets.
The default UQ Equipment Label template includes a unique QR code, which can be scanned by the EZOfficeInventory mobile app, allowing you to quickly check Assets in or out. For more information on the mobile app, please refer to the 'EZOfficeInventory mobile app' section of this guide.
The default UQ Equipment Label template is configured to suit Avery 64x338mm Labels. Please ensure that you select a material suitable for both your model of printer and the asset. For example, do not use Matt White Paper labels for assets that are regulalry exposed to water.
Creating new labels
Follow these steps to generate a PDF document of asset labels suitable for printing.
- Once logged in to EZOffice, mouse-over the 'More' menu option, then click 'Printout Templates'.

- Within the 'Print label templates for Item' section at the top of the page, make sure that the 'UQ Equipment Label' template is selected.

- Mouse-over the 'Items' menu icon, then click on the relevant Asset type.
- Locate and tick the Asset(s) that require Asset labels to be printed.
- Click the blue 'Actions' button, then click 'Print Label'. Your browser will show, or prompt you to download, a PDF document containing the select asset labels.
- Print the PDF document using Avery 64x338mm Labels.
Custom Printout Templates
If required, new printout templates can be created to show specific information or to accomodate for a range of printer models and label sizes. If you require a custom printout template to be created, please submit an EZOfficeInventory request (staff login required).
Locations
Locations refer to the physical storage location of Assets.
Locations are created by ITS administrators for the EZOffice service upon request. If you require one or more Locations to be added to EZOffice, please submit an EZOfficeInventory request (staff login required).
The EZOfficeInventory mobile app
![]()
EZOffice offers a mobile app for both iOS and Android. This app allows you to scan the QR codes on Asset printout labels so you can quickly and easily check Assets in and out. The app can be downloaded from the app store for your iOS or Android device:
EZOfficeInventory for iOS devices
EZOfficeInventory for Android devices
Download the EZOfficeInventory Mobile App guide (PDF, 1.9 MB)
Further queries
Submit an IT request if you:
- would like to request any changes
- have any suggestions to improve EZOffice
- require further support