UQ Service Centre
UQ Service Centre is a cloud-based customer contact centre, enabling support staff to communicate with customers through both audio and video calls from any location.
Request access to the UQ Service Centre
New queue
If you would like to request a new queue or changes to your existing queue, please submit an IT request.
In your request, please provide the following:
- Queue name
- Existing UQ number
- Queue operating hours
- Welcome and out of hours message
- Is call recording required
- Is voice mail required
Existing queue
If you are an employee, please contact your supervisor to organise your Amazon Connect access.
If you are a supervisor looking to grant access to an existing queue, please see the user management tools. When configuring a new user, the following access levels can be applied.
Permissions | |
|---|---|
Agent |
|
Supervisor |
|
Monitor |
|
| SMS |
|
Reporting |
|
| Outage Control |
|
Initial requirements
You will need the following things to use UQ Service Centre:
- Google Chrome or Mozilla Firefox web browser.
- Headset with a dedicated microphone.
- A stable internet connection. VPN is not required.
Headsets
Connect to UQ Service Centre
Computer settings
Begin by ensuring that your computer has been correctly setup to access Amazon Connect
| Windows | macOS | |
|---|---|---|
| Microphone |
|
|
| Screenshare |
|
Browser settings
Next, you will need to setup your browser.
We recommend that you use either Google Chrome or Mozilla Firefox to access UQ Service Centre.
In your web browser of choice, open the UQ Service Centre website.
| Google Chrome | Mozilla Firefox |
|---|---|
|
|
Once completed, refresh the UQ Service Centre page to apply all changes
Receive and handle phone calls
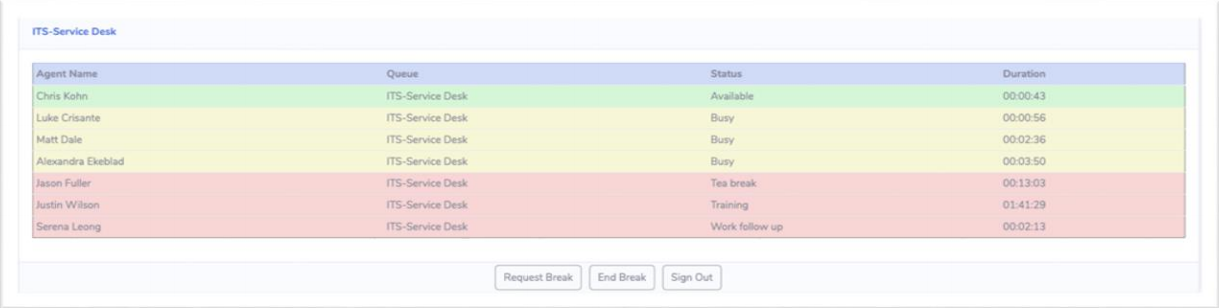
Agent states
Agents are broken up into 3 different statuses:
- Available (green) - The agent is available to take calls when a phone call arrives in the queue.
- Busy (yellow) - The agent is currently busy - they are on a call or in after-call wrap-up time.
- Unavailable (red) - The agent is unavailable. No calls will be delivered to the agent.
Receive calls
When you are in an 'Available' status, you will receive calls in a round-robin rotation, or next available if all other agents are busy or unavailable.
When a call comes through to you, you will hear an audible ring through your computer's headphones and an 'Incoming Call' alert will appear on the screen. You can select:
- Answer - Accept the call, or
- Reject - Reject the call and pass it on to the next available agent.
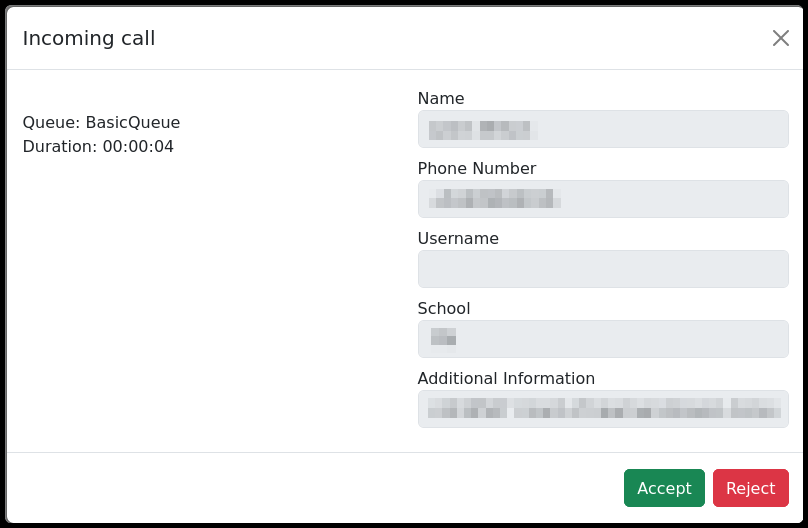
If you miss 3 calls in a row, you will be automatically logged out.
Call controls
Once you are connected to a call, you will see the following call buttons:
- Hold/Unhold - Switch between placing the caller on hold, or unhold.
- Transfer - Transfer the call to another agent / queue / extension.
- Keypad - Display an on-screen keypad.
- Edit profile - Unlocks the profile fields to update
- Call Controls - Additional call controls (Enable and disable call recording)
- End Call - Disconnect the call.
- Customer History - Displays a list of recent calls the customer has made.

Transfer
Transfer allows you to select another destination, then warm or cold transfer the call.
- Select a destination text field (When selecting an option, your previously favourited contacts will appear)
- Search for your desired transfer location
- Phone number - Allows you to enter a UQ extension, local phone number or a complete phone number.
(e.g 56000, 33650000, +61733650000). - Agent - Search for another agent using their first name.
- Queue - Search for another queue based on a partial match on their name.
(e.g 'ITS' will return results for the ITS-Service Desk) - Quick connects - This will allow you to search for quick connects that have been configured on your queue. These are normally external numbers that need to be configured in advance.
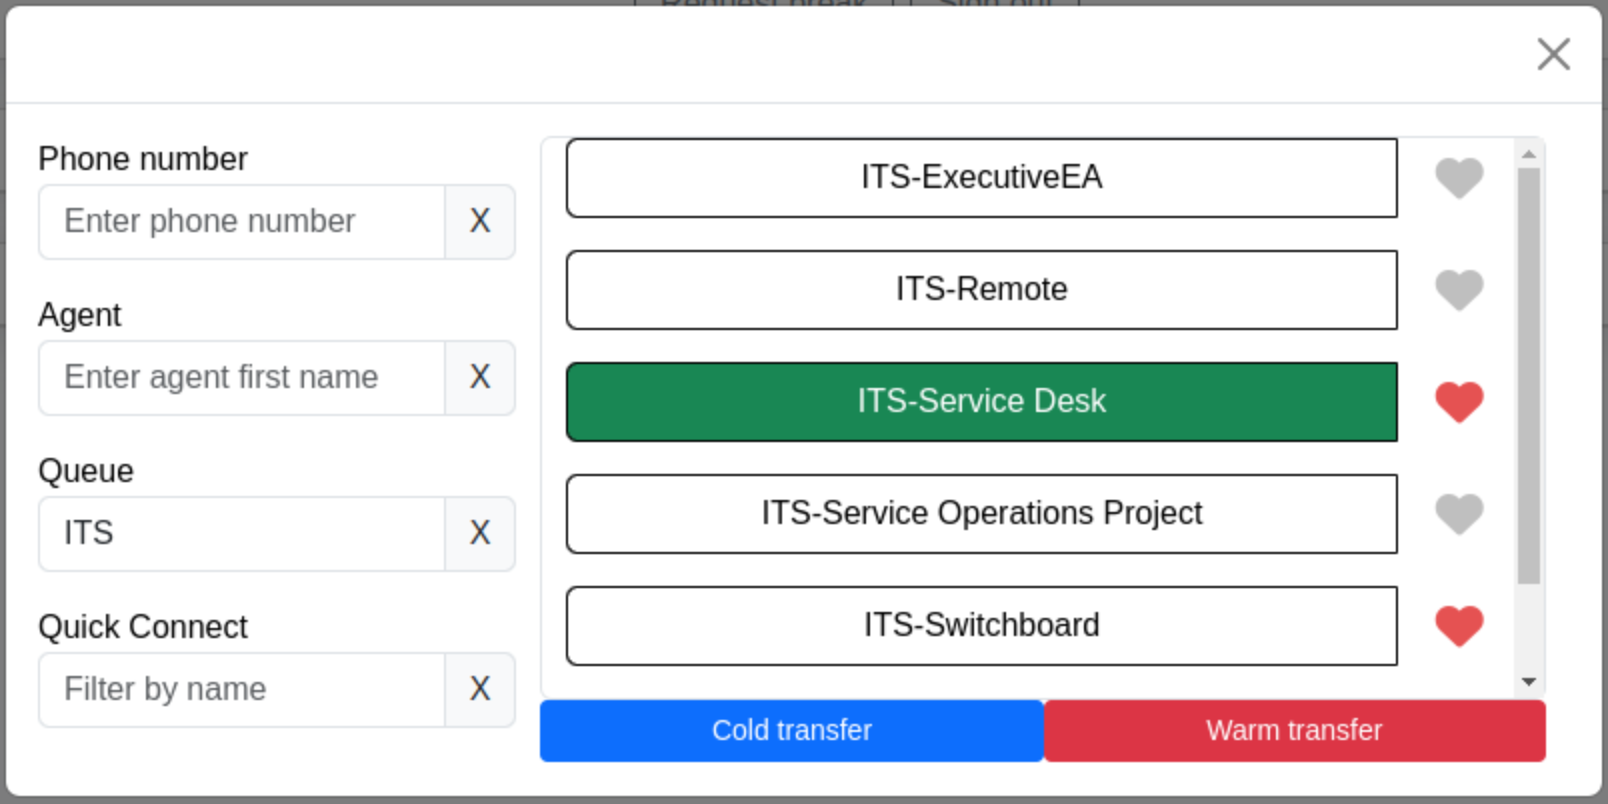
- Phone number - Allows you to enter a UQ extension, local phone number or a complete phone number.
- Select the desired location and press either Warm or Cold transfer.
- Warm Transfer - You will remain on the line, speaking to the next staff member. See Multiline calls
- Cold Transfer - Instantly redirect the call to the transferred number and end your connection with the call. The call will not return to you if the transferred number does not answer.
Multiline calls
During a multiline call. You will have a number of controls to help route your call.
![]()
At the top of the call window, you can see your active phone lines.
- Parked - The call is currently on hold. The customer is unable to hear anything that is being said on the call
- Active - You are able to speak with that customer
Clicking on either button will switch your active line, placing the current active line on hold.
While on a multiline call, you will also have a number of call controls;
- Hold - Places the current active call on hold. To resume a line again, click on the line button.
- Conference - Connects both lines together for a 3-way call.
- Hand off - Connects both lines together and then disconnects from the call.
- Keypad - Displays the keypad
- End call - Disconnects the current active line (E.g If line 2 is active, Line 2 will be disconnected and you will return to Line 1)
- Leave call - This option appears when a call has been transfered to you. Pressing leave call will disconnect yourself from the phone call, leaving the original customer and agent connected.
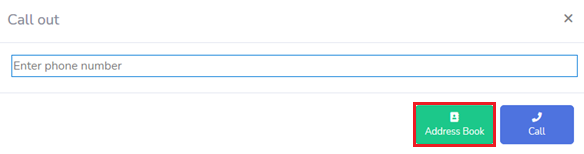
Address book
The UQ Service Centre address book allows you to search for any queue within UQ Service Centre, as well as the quick connects relating to the user's queue.
The address book can be accessed through the Dashboard by clicking 'New Call', then 'Address Book'.
Call wrapup
After a call, you will move into after-call wrap-up time.
The amount of wrap-up time you have depends on what your supervisor or manager has set. When wrap-up time finishes, you will become available again to take calls.
During wrap-up time, select:
- 'Set Available' or 'Request Break', or
- the wrap-up code which best describes the nature of the call.
Voicemail

From within the voicemail tool, you can find the transcript of the voicemail or the direct recording.
A staff member can also choose to call the user back or remove the voicemail.
Removing a voicemail will remove the message from everyones list.
Receive and handle video calls
If your queue has been set up to receive video calls, instructions for using the functionality can be found below;
Video preferences
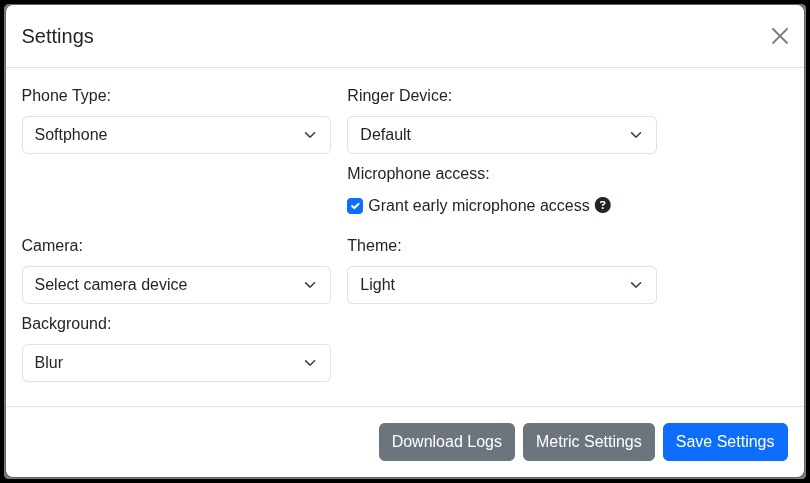
Agents can configure their video calling preferences from inside Service Centre’s settings window.
- Click on Settings in the profile dropdown
- Set Camera device to your preferred camera.
- Set the background to your preferred type.
- Click Save.
Agents can also temporarily change the video settings from the video call modal itself.
Receiving a video call
A video call will be answered in the same way as a telephone call.
While on a compatible phone call, agents have the option to convert the call into a video call using the ‘Video call’ button. Clicking this will open the video call modal.
(This will automatically open when a customer turns on their camera)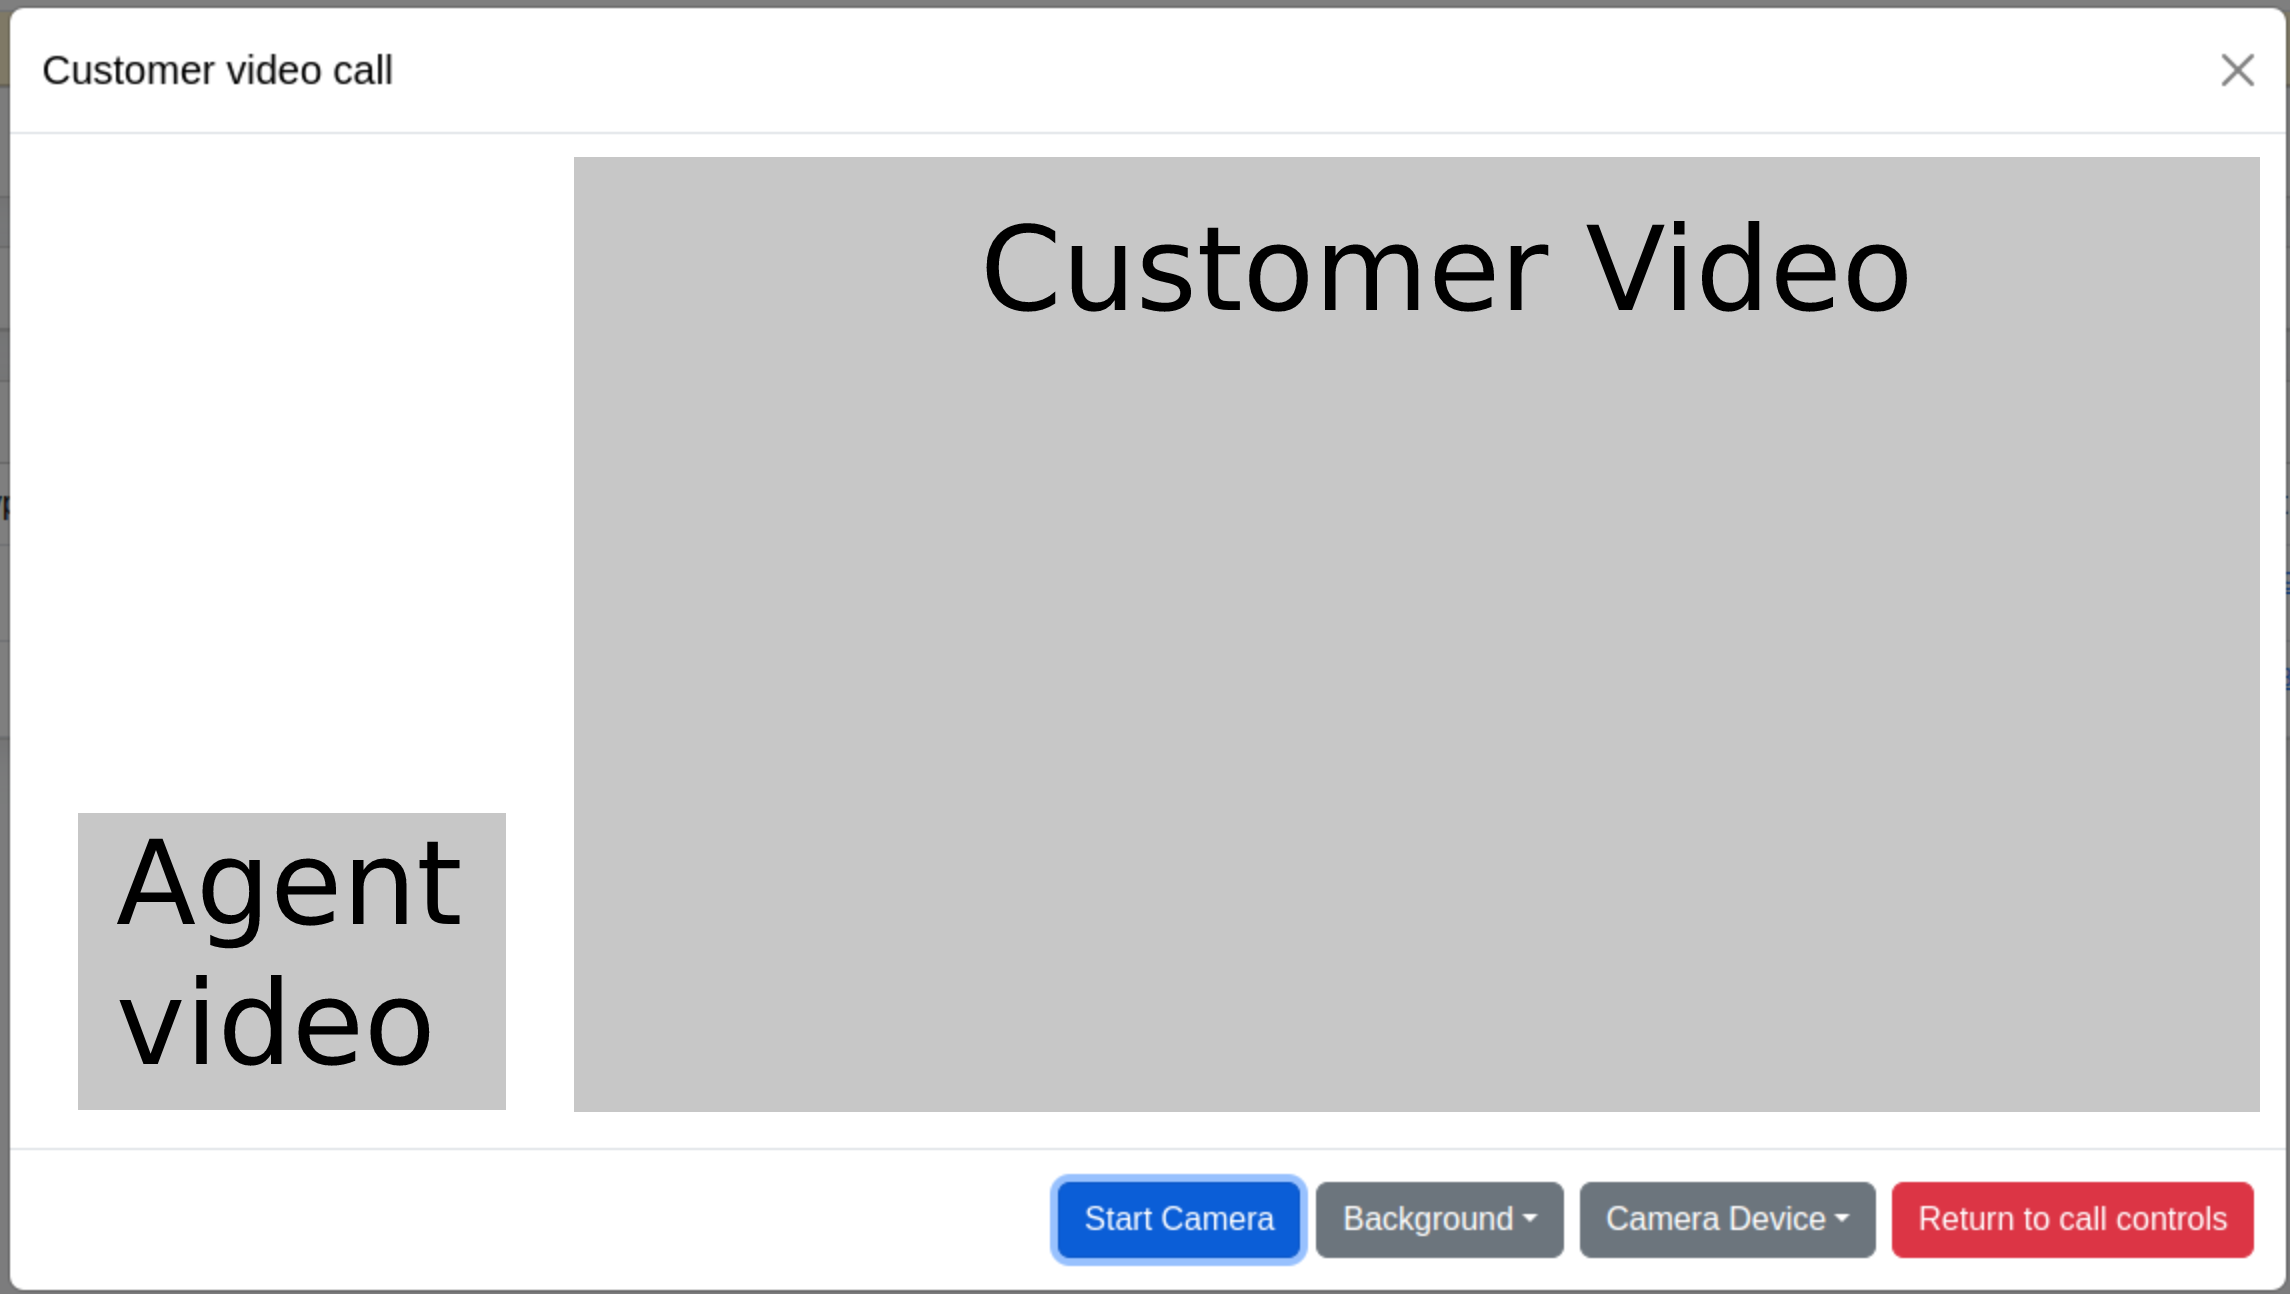
When a video call is started, an agent can decide if / when they would like to enable their camera. Press the ‘Start camera’ button to turn on your camera. At any time, you can disable/re-enable your camera.
You will also find options to temporarily change camera devices or virtual background on this window.
Handling a video call
While on a video call, you will still have access to all of the same controls found on a standard phone call.
- Hold - This will hold the voice section of the phone call. If enabled - your camera will still display on the customers call.
- Transfer - When transferring a video call, your camera will be turned off automatically. When the receiving agent answers the call, both agents can choose to join the video call.
While a customer is on hold, they will still be able to see any other active camera but no audio can be heard. If an agent decides to conference the call, all parties will be able to see and hear one another.
Scheduling a video call
If you would like to schedule a video call with a customer, you can use the Schedule video call tool to send an invitation link that will expire after a single use.
The scheduling tool can be found on the left menu under Schedule Video Chat.
Agent settings
Switch between using a softphone or a physical phone
You can switch between using a softphone or a physical phone (desk or mobile):
- On the Dashboard, select your profile on the bottom-left of the page, then select 'Settings'.
- In the phone type, select Softphone or Deskphone
If you select 'Deskphone', enter your phone number in the phone number field. You can enter your full number, or UQ extension number. - Click 'Save Changes'.
You can switch phone type at any time, as long as you are not on a call.
Play your phone ringtone through speakers
You can make the incoming call audible ring play through your speakers:
- On the Dashboard, select your profile on the bottom-left of the page, then select 'Settings'.
- Ensure 'Phone Type' is set to 'Softphone'.
- In the 'Ringer Device' drop down menu, select your speaker device.
- Click 'Save Settings'.
Phone calls will now ring through both your headset and speakers.
Firefox users: Please note that this functionality is temporarily unavailable due to a recent Firefox update.Switch profiles
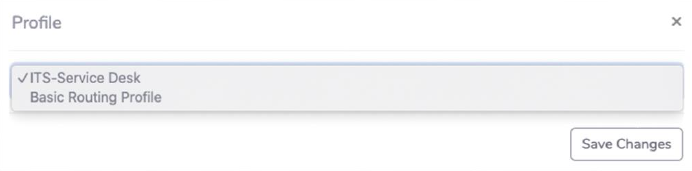
If you have been assigned multiple profiles, you can switch between them as required:
- On the Dashboard, select your profile on the bottom-left of the page, then select 'Profile'.
- Select the profile from the drop down menu, then click 'Save Changes'.
The profile will update and the page will reload automatically.
Sign out
To sign out of a phone queue:
- On the Dashboard, select your name on the top-right of the page, then select 'Logout'.
- Click 'Signout' to confirm.
To sign out of UQ Service Centre completely:
- On the Dashboard, select 'Connect Administration' on the left menu.
- On the Amazon Connect page, click the logout arrow beside your name on the top-right of the page.
Supervisor management tools
Change agent statuses
Supervisors can update the status of their agents using Service Centre
- Right click on an agent and select "Set status"
- In the pop up that appears, select the status you wish to put the agent in
- Click Set status
Monitor agent calls
Supervisors can monitor an agent's call in real-time. This allows you to listen in to both the customer and agent without interrupting the call in any way.
To monitor a call:
- Right-click on the agent on a call.
- Select 'Monitor'
Alerts and outages
Supervisors of a queue can set custom outages and alerts on their queues:
- On the navigation bar, click Alerts and outages
- Select the desired queue in the drop down.
- On the left, you will see your existing outages/alerts and a new outage button.
- Clicking on an existing outage will allow you to edit or remove it - Click new outage
- Specify the start and end time of the outage.
- Select the type of outage (See below for a description)
- Enter the message that will be played to the customer
- Press Save
Outage types
- Alert - A message that is played after your queue greeting and before the customer is placed in queue
- Closure - Closes the queue, a message is played before disconnecting the call
- Closure - Out of hours - Closes the queue, redirecting calls to your out of hours message / flow
- Open - Additional hours - Opens the queue outside of normal operating hours.
- Transfer - Phone - Redirects all calls coming into a queue to a seperate phone number
- Transfer - Queue - Redirects all calls coming into a queue to a seperate queue.
User management
Supervisors can add, remove, and modify the staff in their queue using the User management functionality.
The user management tool can be found on the navigation bar of the UQ Service Centre
Create a new user
- Press the ‘Create user’ button and the new user form will appear.
- When creating an agent, you will need to fill in the following information:
- Routing profile: This defines what profile the agent will be given. This profile indicates which queues the agent will have access to.
- Agent permissions: Agents should only be given the permissions they require to complete their role.
- Agent hierarchy: This defines reporting structure. Using the above picture as an example, Anyone in the Service Desk hierarchy will only be able to report on Service Desk agents, while anyone in the Information Technology Services hierarchy, will be able to report on all sub-hierarchy groups.
- After-call work time: The grace period after a phone call before the agent can receive another call. The default used across most queues is 15 seconds
- Additional profiles: Provides the agent access to additional profiles. Agents can switch between these profiles by selecting the “Profile” button in their profile menu
If you attempt to create a user who has already been assigned access to Amazon Connect, you will receive a pop-up asking if you want to add additional profiles to the account or overwrite their existing access:
- Overwrite: This will remove all existing access and grant the user only access to the required queues.
- Add profiles: Will add the routing profile and the additional profiles to the user's account. Remaining all other settings as is.
Manage quick connects
Supervisors can create, modify or remove quick connects from their queue using the Quick Connect tool in Service Centre.
To access the quick connects tool, click on Quick Connects button in the navigation bar.
Creating a quick connect
- Click 'New Quick Connect'
- The name of the quick connect must be unique across Amazon Connect.
- If the name has already been used, we recommend adding your department to the end (e.g. John Smith (ITS))
- The number should be a complete phone number (including area code) or a UQ extension
- Click Save
Editing quick connect
- Click 'Edit'
- Enter the new name or phone number
- Click Save
Remove a quick connect
- Click the Delete button
- The quick connect should be removed from the list after a refresh of Service Centre.
Assigning a quick connect to multiple queues
If you have access to multiple queues, you can give each queue access to a quick connect by clicking the 'Assign Queues' button.
In the pop up, select which queues should have access to use the quick connect and click Save.
Reporting
Staff that have been granted access to run reports will see a 'Metrics and quality' tab on the left menu of the Amazon Connect Administration page.
Real-time metrics
Real-time metrics allows you to monitor your queue in real-time to track important information such as:
- Average queue time
- Average call duration
- Number of answered/abandoned calls.
The real-time metrics update automatically every 15 seconds and you can view information in the last 24 hours.
Historical metrics
You can run reports based on historical data. Select:
- Queues - Generate queue statistics over a given time frame
- Agents - Generate reports on all agents in a particular queue.
After selecting one of the above options:
- Select the cog icon on the top right of the page.
- In the 'Interval & Time range' tab, select:
- Interval - choose from the groupings below:
- 30 minutes - Maximum reporting range of 3 days
- Daily - Maximum reporting range of 30 days
- Total - Maximum reporting range of 30 days
- Time zone - Australia/Brisbane
- Time range - Specify the date range of the report.
- Interval - choose from the groupings below:
- In the 'Filters' tab, select the 'Queue' filter and choose the queues from the drop down list.
- In the 'Metrics' tab, select the data you wish to use.
- Click 'Apply'.
Once your report has finished loading, you can select the drop down arrow next to 'Save' and select 'Download CSV'.
Contact search
Contact search allows you to report on all calls that were made to your queue. The report includes:
- Time of call
- Call duration
- Hold duration
- Number of holds
- Customer's phone number
- Agent who handled the call.
If your queue has call recording enabled, you can view the call record here too.
Sending SMS messages
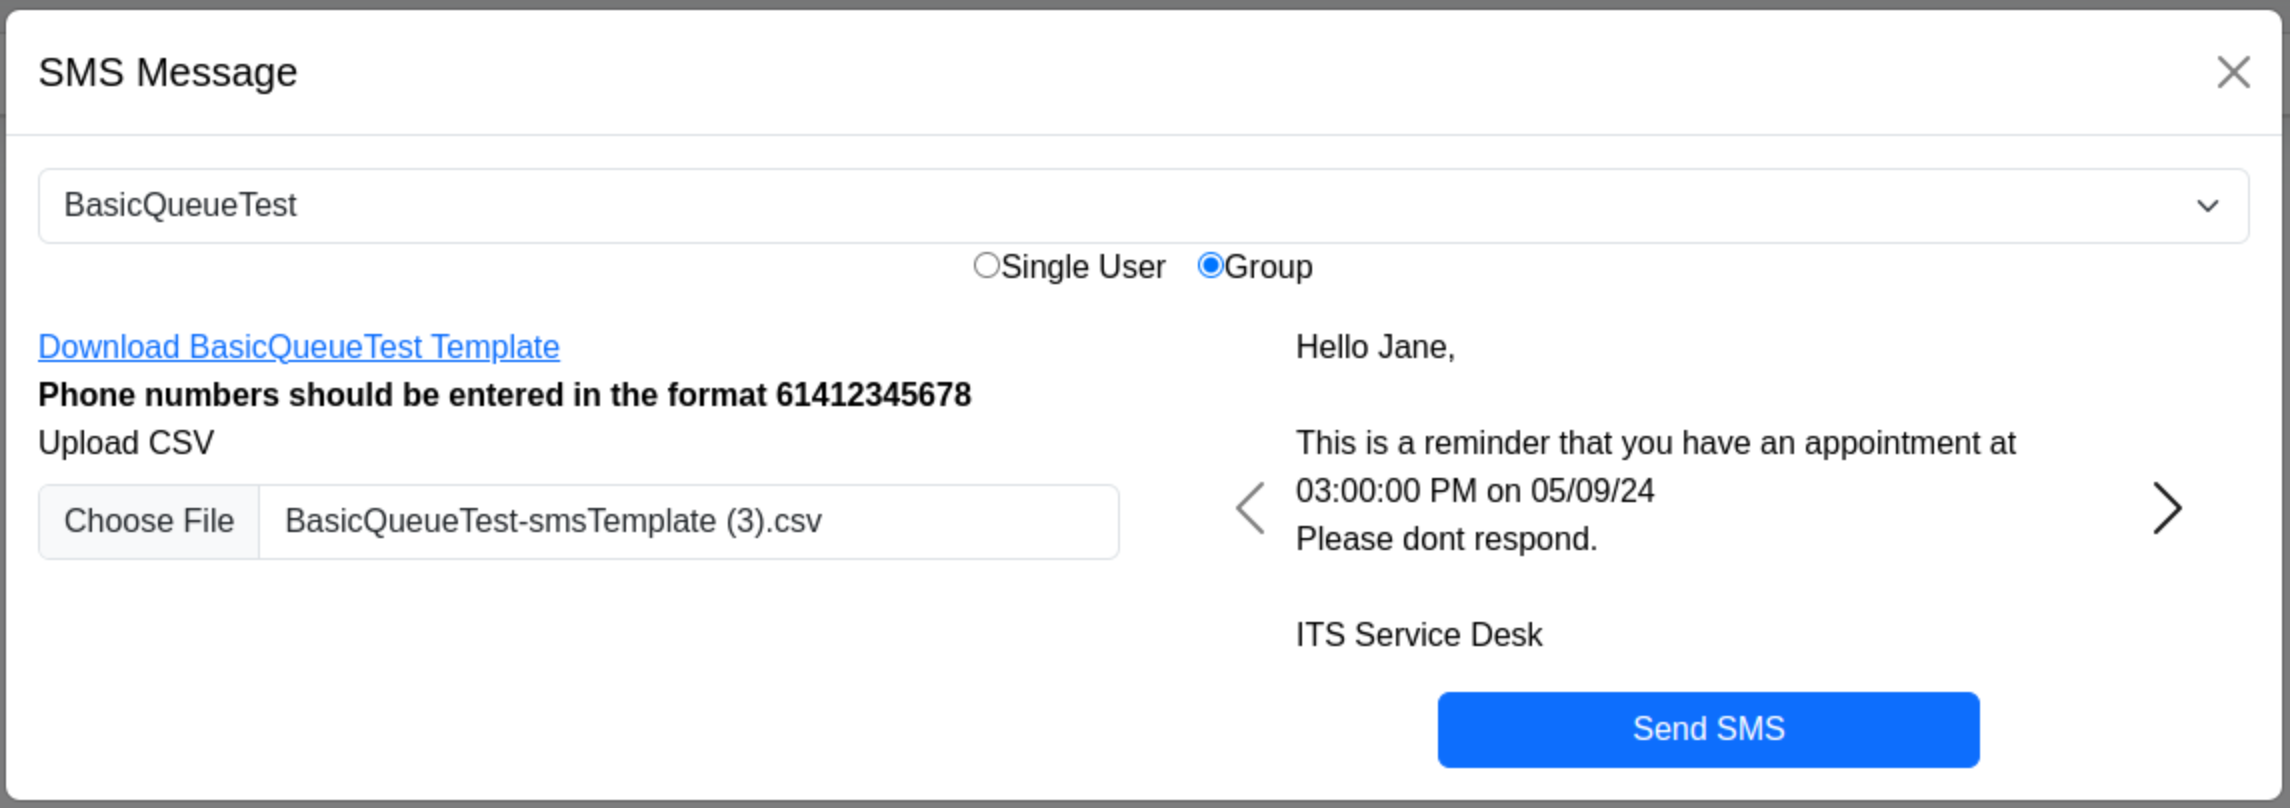
Agents with the correct permissions can send SMS messages using predefined templates to a single or group of recipients using the SMS tool inside Service Centre.
Sending a message
Once an agent has been granted SMS permissions, an SMS button will appear in the navigation menu.
- Open the SMS tool
- In the drop-down box, select the appropriate template
- Choose if you will be sending the message to a single person or a group
-
Single user Group user - Enter the customer's number
- Fill in the required fields
- Review the SMS message on the right side of the SMS tool
- When you're happy with the message, click send.

- Click the link to download the template file.
- Using Excel, open the file
- Fill in the required details for each row
(Phone numbers should contain the country and area code - E.g +61412345678) - Save the file
- Press the 'Choose file' button and then select your template.
- Review the SMS message using the arrows on the right.
- When you're happy with the message, click send.
Receiving SMS responses
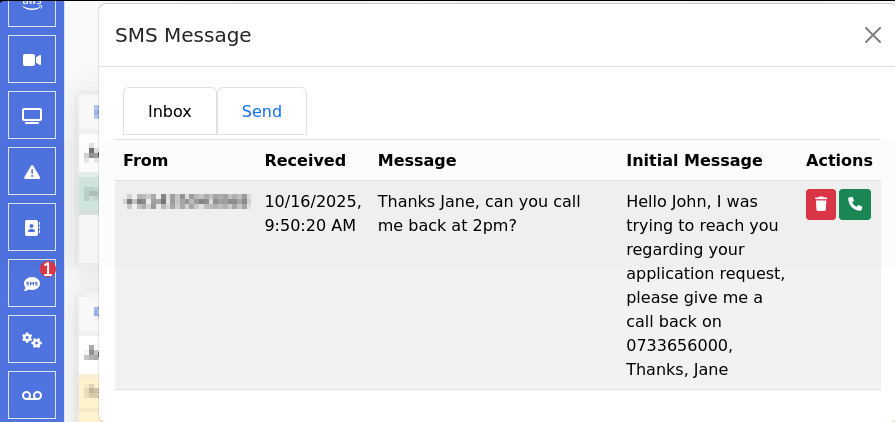
Opening the SMS tool will allow you to view the SMS inbox for your queue.
This tool allows you to call the customer or mark the message as read and remove it from the inbox.
Requesting a new template
If you would like to change an existing template or create a new template, please Submit an IT request
In your request please include:
- Name of the template.
- The template itself and what fields are required.
- Is two-way SMS required? (Customer can respond)
- If required, please also include an email address to deliver the responses to.
- What queues should have access to this template.
Changes, improvements and support
Submit an IT request if you:
- would like to request any changes
- have any suggestions to improve UQ Service Centre
- require further support